


To deploy a .NET app to DigitalOcean with Dokploy: create a droplet, install Dokploy with a single command, point it at your GitHub repo, tell it to build from your Dockerfile, expose port 8080, and add a domain with automatic SSL. Dokploy is a free, open-source, self-hosted PaaS that turns a plain VPS into something that feels like Vercel or Render, but on infrastructure you own. If you have been paying Azure App Service, AWS Elastic Beanstalk, or Render prices for a small .NET app, this is the setup that replaces them for a flat monthly VPS bill, and this guide walks the whole thing end to end.
I recently shipped a real app this way. It is a multi-tenant dental management SaaS I built with Claude Code: a .NET 10 Web API that follows REST API best practices on the backend, plus two React frontends. One is the clinic app the dentists use, and the other is a separate platform-admin app where I create new tenants and manage billing. Instead of reaching for a managed platform, I put the whole thing on one DigitalOcean droplet in the Bangalore region, wired up a managed Postgres database, a Valkey cache, and Cloudflare R2 for file storage, and let Dokploy orchestrate all of it. This guide is the exact process, start to finish, including the parts that broke.
TL;DR. Spin up a DigitalOcean droplet (2 GB RAM minimum, 4 GB comfortable), install Dokploy with
curl -sSL https://dokploy.com/install.sh | sh, and open the dashboard athttp://<your-ip>:3000. Deploy the .NET 10 Web API exposing port 8080, deploy two React frontends (a clinic app and a platform-admin app) behind Nginx, run Valkey as a container for caching, and connect a DigitalOcean Managed Postgres database. Add Cloudflare R2 (S3-compatible, zero egress fees) for uploads. Point Cloudflare subdomains at each app and Dokploy provisions Let’s Encrypt SSL through Traefik automatically. Because building .NET images on the droplet spiked CPU to 90%, I moved builds to GitHub Actions and let Dokploy deploy the prebuilt image. Hide the origin behind Cloudflare’s proxy and a DigitalOcean firewall. Total cost runs about $40 per month.
What is Dokploy?
Dokploy is an open-source, self-hostable Platform as a Service (PaaS) that deploys and manages your applications and databases using Docker and Traefik. You install it on any VPS, connect a Git repository, and it handles building your container, routing traffic, issuing SSL certificates, and redeploying on every push. It launched in April 2024 and has grown fast, sitting at around 36,000 GitHub stars.
The mental model is simple: Dokploy is Vercel or Render that you host yourself. You keep the one-click deploy experience, the Git integration, and the automatic HTTPS, but you drop the per-seat pricing and the vendor lock-in. Your app runs on a server you control, and your bill is a fixed droplet price instead of a usage meter.
Is Dokploy free?
Yes, self-hosting Dokploy is free. The core is open-source under Apache 2.0 (a few enterprise features are proprietary, and there is a paid cloud tier if you do not want to manage your own server), but nothing in this guide touches the paid parts. The only thing you pay for is the server it runs on. That is the entire pitch: a managed-PaaS workflow at raw-VPS prices. For a solo developer or a small SaaS, this is the cheapest way to get a production deployment that still feels modern.
Docker Guide for .NET Developers
If Dockerfiles, images, and multi-stage builds are new to you, start here. This guide assumes you can containerize a .NET app.
Can I run a .NET app on a VPS instead of Azure App Service?
Yes. An ASP.NET Core app in a Docker container runs on any Linux VPS, and nothing in .NET 10 requires a managed host. What App Service actually sells you is the operational layer around the container: TLS certificates, reverse proxying, health checks, and redeploy on push. Dokploy gives you that same layer on a VPS you rent for a flat monthly price, which is why the swap is viable rather than just cheaper.
The trade you are making is real, though. On a VPS you own patching, backups, and being the person who gets paged when the box runs out of disk. That is the right trade for a solo developer or a small SaaS with a predictable load, and the wrong one for a team that needs autoscaling, a compliance story, or an on-call rotation it does not have.
How much does it cost to self-host a .NET app?
The setup in this guide runs about $40 per month: a 4 GB DigitalOcean droplet, a managed Postgres node, and Cloudflare R2 for storage, with Valkey running as a container on the droplet rather than as a paid managed service. The equivalent architecture on AWS lands between $110 and $170 per month. I break both bills down line by line in what it actually costs further down.
The number that matters is not the headline price but its shape. A VPS bill is flat and predictable, while a managed-PaaS bill is metered and moves with traffic. For a small app the flat bill almost always wins, and it stops winning at the point where you would need to run several droplets and load balance between them yourself.
The architecture I deployed
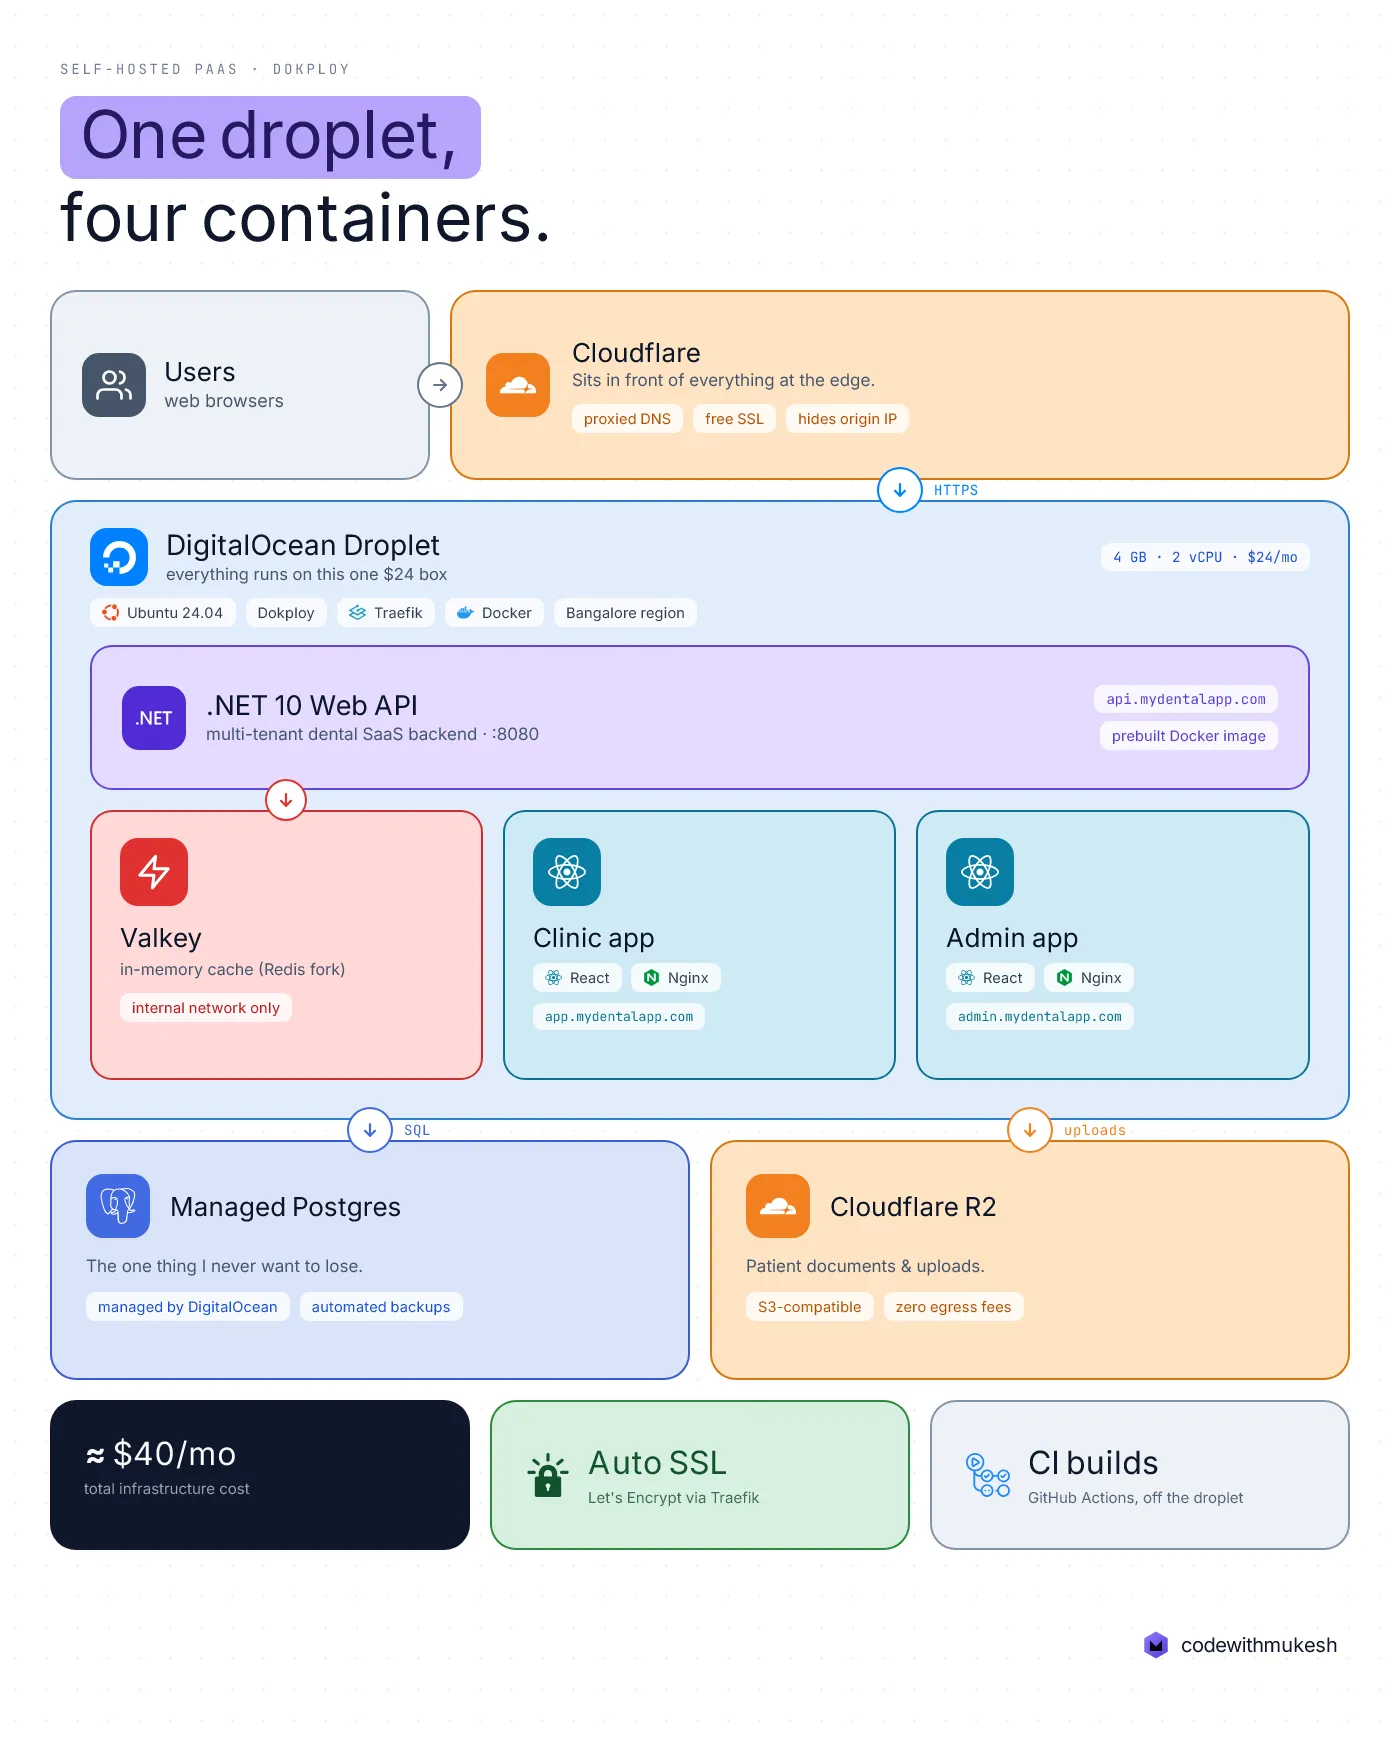
Before the steps, here is what the finished setup looks like so each piece has a place to land:
- Cloudflare sits in front of everything, proxying DNS so the droplet’s real IP stays hidden.
- One DigitalOcean droplet running Dokploy. This is the machine that hosts everything (builds later moved to GitHub Actions).
- .NET 10 Web API container - the backend, exposing port 8080 internally, reached at
api.mydentalapp.com. - Clinic React container - the app dentists use, static build served by Nginx, reached at
app.mydentalapp.com. - Admin React container - my platform-admin app for creating tenants and managing billing, reached at
admin.mydentalapp.com. - Valkey container - an in-memory cache (a Redis fork), reachable by the API over the internal Docker network.
- DigitalOcean Managed Postgres - the relational database, running outside the droplet as a managed service with automated backups.
- Cloudflare R2 - object storage for patient documents and uploads, S3-compatible with zero egress fees.
The one judgment call worth calling out early: I put Postgres on a managed node but kept Valkey as a plain container. I will explain why in the decision section, but the short version is that the database is the one thing I never want to lose, and the cache is the one thing I never mind rebuilding.
Prerequisites
You will need a few accounts and tools before starting:
- A DigitalOcean account. New accounts get free sign-up credit when created through a referral - create an account with my referral link and the current offer is applied automatically. (DigitalOcean adjusts the credit amount from time to time, so check what the sign-up page shows.)
- A domain name. Any registrar works. You will point two subdomains at the droplet.
- A GitHub repository with your app’s code and Dockerfiles.
- Basic Docker knowledge. You should be comfortable writing a Dockerfile. Everything else, Dokploy handles.
Step 1: Create the DigitalOcean droplet
In the DigitalOcean console, create a new droplet. If you do not have an account yet, sign up with my referral link first - the free credit is enough to run this entire setup for a while before you pay anything.
- Choose an image: Ubuntu 24.04 LTS.
- Choose a region: pick the one closest to your users. I used Bangalore because most of my users are in India, and latency to a local region is noticeably better than routing to Frankfurt or New York.
- Choose a size: Dokploy requires at least 2 GB of RAM and 30 GB of disk. I went with the 4 GB / 2 vCPU Basic droplet ($24/month). That runs the app comfortably, but building .NET images on the droplet spiked CPU to 90% during every deploy. I later moved builds off the box to GitHub Actions, which I cover in Step 11. If you plan to build in CI from the start, a 2 GB droplet is enough.
- Authentication: choose SSH Key and add yours. If you have not created an SSH key before, Step 2 walks through generating one - do that first, then paste the public key here. Skip password authentication; keys are safer and save you from typing a password on every connection.
- Managed database (optional here): I created the managed PostgreSQL cluster around the same time as the droplet, from the console’s Databases section. Depending on the image you pick, the droplet creation flow may also offer to attach one directly (some Marketplace images do; the stock Ubuntu flow does not). Step 5 covers the full setup either way.
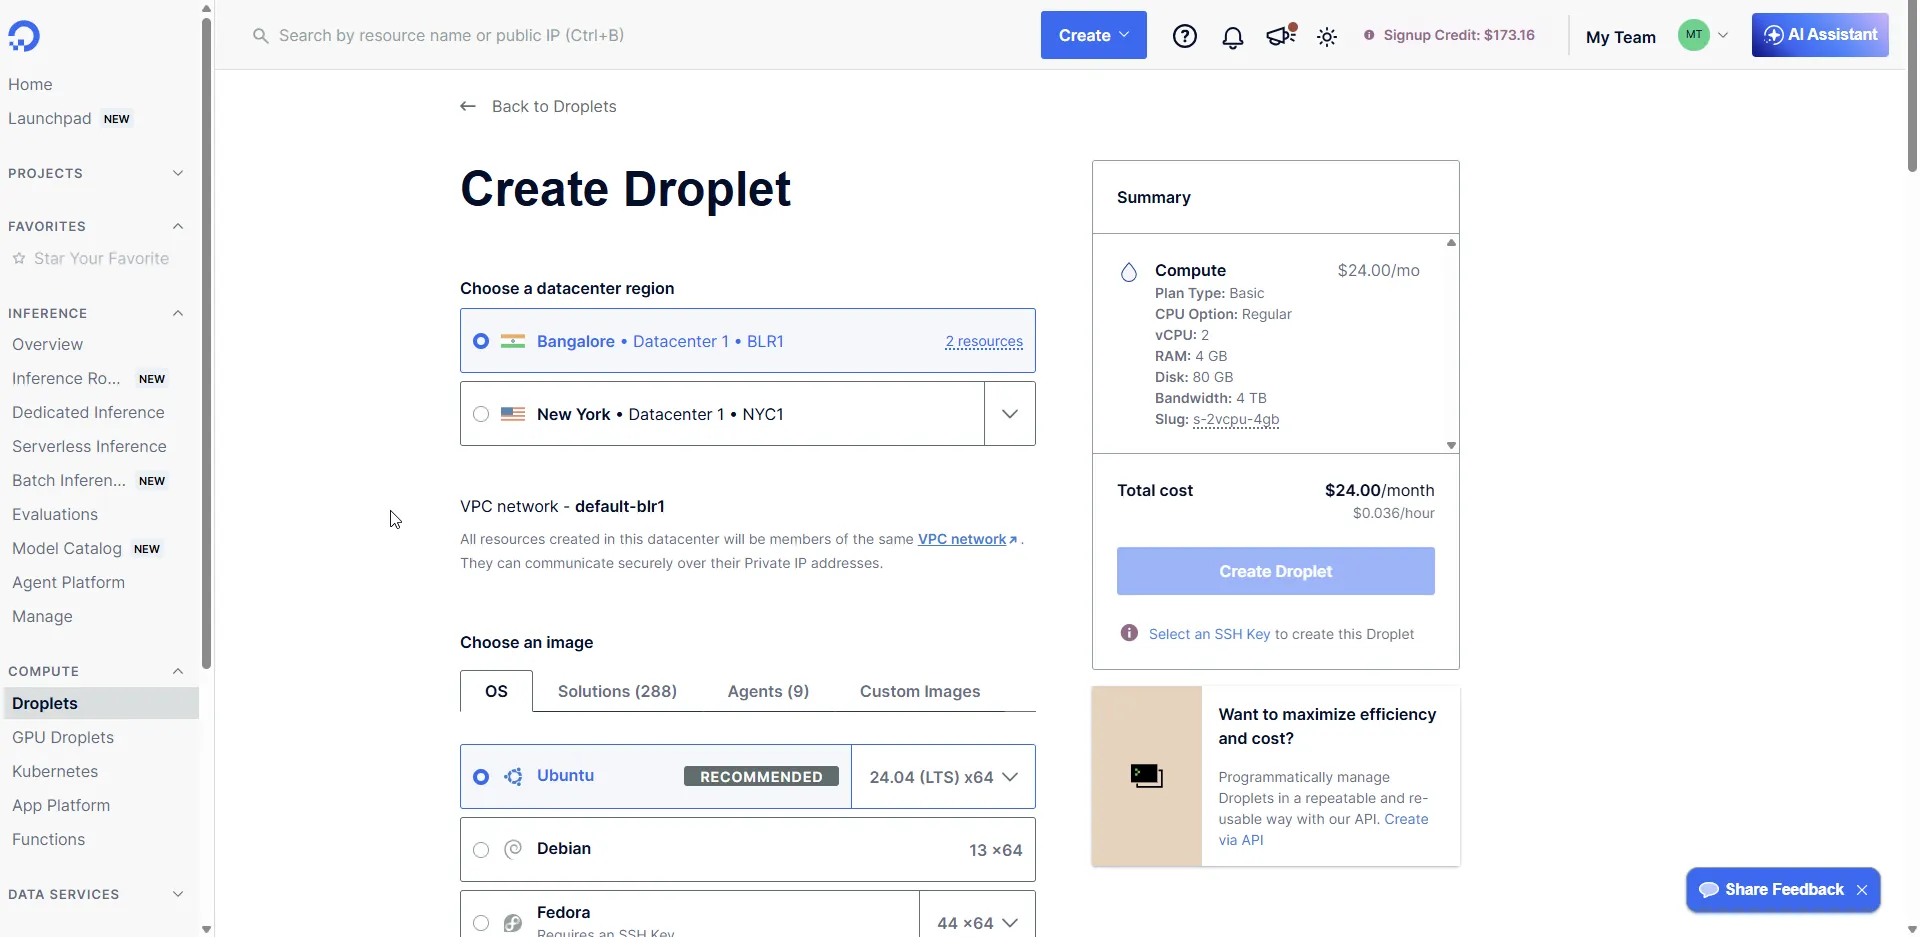
Create the droplet and note its public IP address.
Step 2: Set up SSH and connect to your droplet
SSH (Secure Shell) is how you get a terminal on the droplet. Instead of a password, you authenticate with a key pair: a private key that stays on your machine, and a matching public key that lives on the server. This is both safer and more convenient than a password, and it is what DigitalOcean expects. Modern Windows and macOS both ship with the OpenSSH client built in, so there is nothing to install.
Generate an SSH key (Windows and macOS)
The command is identical on both platforms. Open a terminal:
- Windows: open PowerShell or Windows Terminal (Windows 10 and 11 include OpenSSH by default).
- macOS: open Terminal.
Then generate a key:
ssh-keygen -t ed25519 -C "your-email@example.com"Press Enter to accept the default location. You can set a passphrase for extra protection or leave it blank. This creates two files in the .ssh folder of your home directory:
- Private key -
id_ed25519. This never leaves your machine. Do not share it. - Public key -
id_ed25519.pub. This is the one you give to DigitalOcean.
On Windows the folder is C:\Users\<you>\.ssh\, and on macOS it is ~/.ssh/.
Copy your public key
Print the public key so you can copy the whole line:
# Windows (PowerShell)Get-Content $env:USERPROFILE\.ssh\id_ed25519.pub# macOScat ~/.ssh/id_ed25519.pub# or copy it straight to the clipboard:pbcopy < ~/.ssh/id_ed25519.pubIt starts with ssh-ed25519 and ends with the email you passed. Copy the entire line.
Add the key to DigitalOcean
You can attach the key while creating the droplet in Step 1: in the Authentication section, choose SSH Key, click New SSH Key, and paste the public key. That is what I did, and it means the droplet trusts my machine from the first boot.
If you already created the droplet with a password, add the key afterwards from your terminal:
ssh-copy-id root@your-droplet-ipConnect to the droplet
Now open the connection. Replace the IP with your droplet’s public IP from Step 1:
ssh root@your-droplet-ipThe first time you connect, SSH asks you to confirm the server’s fingerprint. Type yes. Because your key handles authentication, you are dropped straight into a root shell on the droplet with no password prompt.
If you see Permission denied (publickey), the key on the droplet does not match your private key. Confirm you pasted the correct .pub file into DigitalOcean, or point SSH at the key explicitly:
ssh -i ~/.ssh/id_ed25519 root@your-droplet-ipStep 3: Install Dokploy
With your SSH session open on the droplet, run the install script:
curl -sSL https://dokploy.com/install.sh | shThe script installs Docker if it is not present, then pulls and starts Dokploy. It takes a couple of minutes. When it finishes, open the dashboard in your browser:
http://your-droplet-ip:3000The first visit asks you to create an admin account. Set a strong password. This is the login for your entire deployment control panel, so treat it like a production credential.
Once you are in, create a Project. A project is just a container for related applications and databases. I named mine after the app. Every service I add next lives inside this project.
Inside the project, Dokploy lets you split work into environments. I created two: demo and production. Demo is where I test changes and show the app to prospective clinics without touching live data, and production is the real deployment. Each environment holds its own copy of the services and, importantly, its own environment variables. That means the same API image can point at a throwaway demo database in one environment and the managed Postgres in the other, with no code change. My promotion flow is simple: deploy to demo, confirm it works, then deploy the same build to production.
Step 4: Connect GitHub to Dokploy
Before Dokploy can pull code from a repository, you have to connect a Git provider. Dokploy does not read repos anonymously - it authenticates as you through a provider integration, and this is a one-time setup you do before creating any application.
In the sidebar, open Settings, Git. Under Git Providers you will see GitHub, GitLab, Bitbucket, and Gitea. My code is on GitHub, so I click GitHub and authorize the connection.
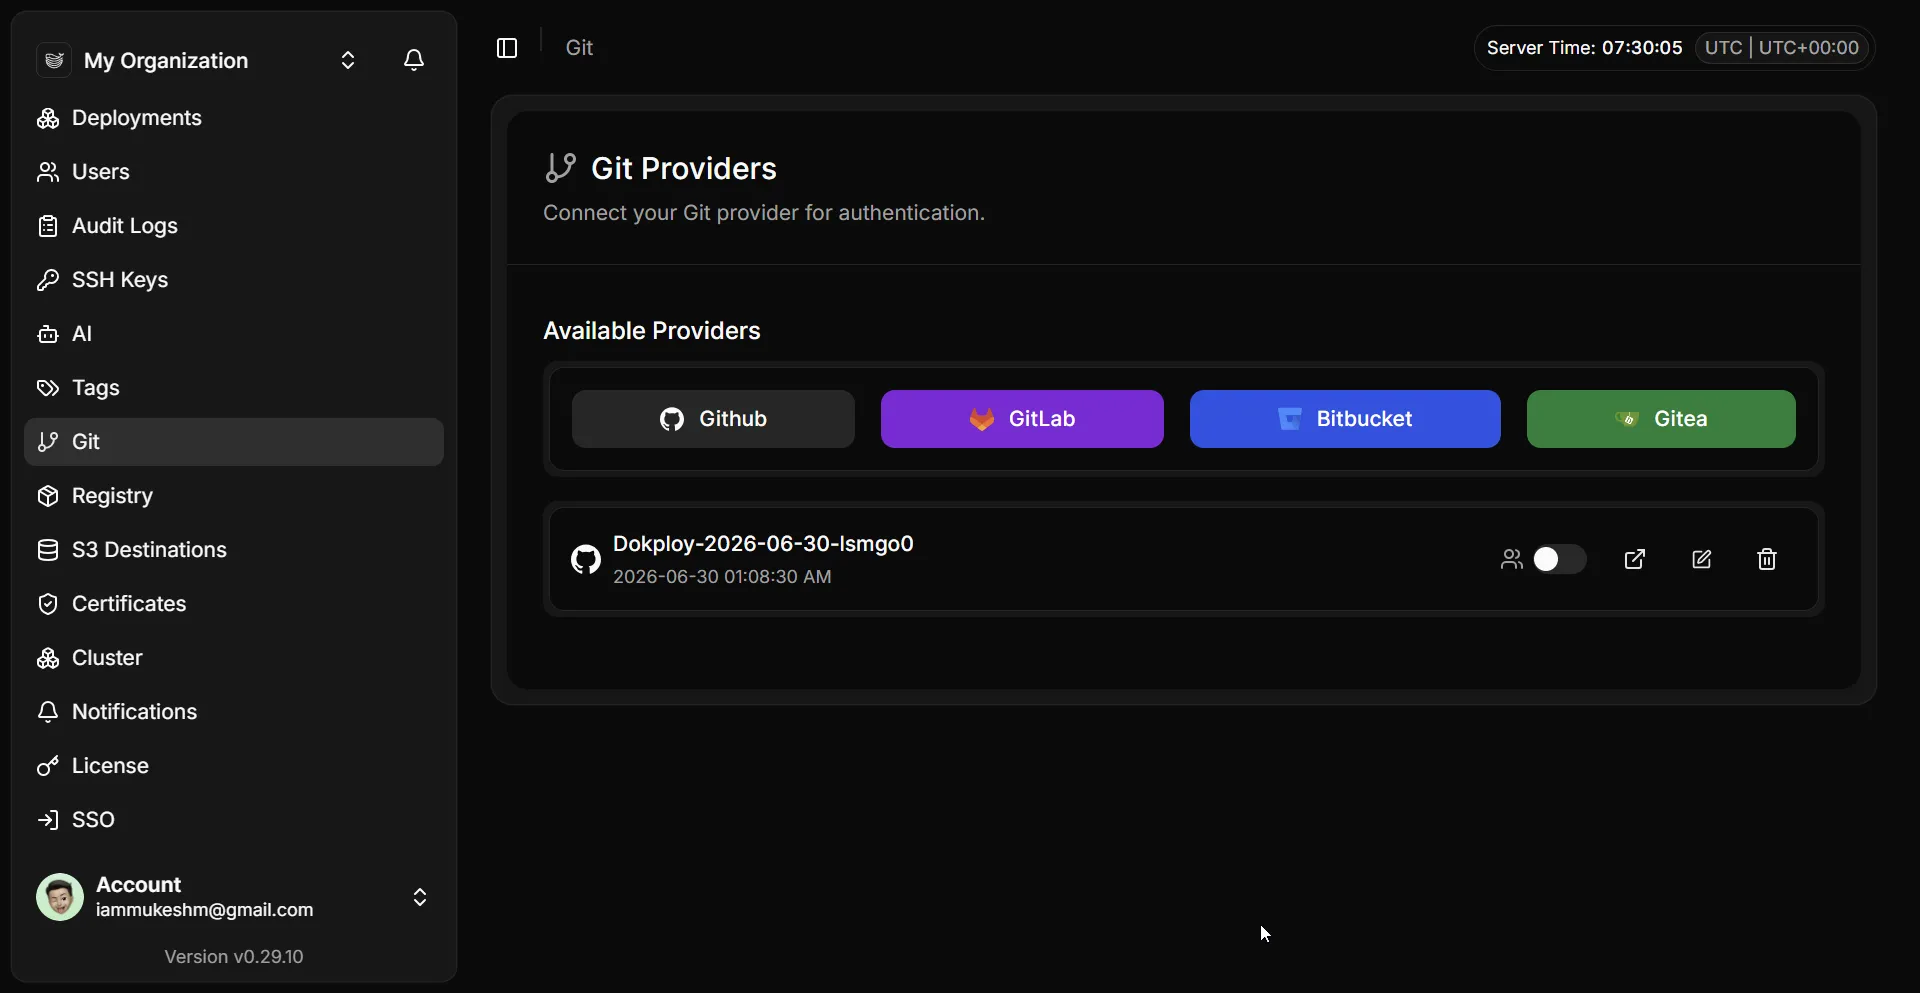
Authorizing installs a GitHub App on your account or organization. GitHub asks which repositories Dokploy is allowed to access - you can grant all of them or pick specific repos - then redirects back to Dokploy, where the provider now appears in the list. Only after this is done can you select a GitHub repository when creating an application. Skip it, and the repository dropdown in the next steps is simply empty.
Step 5: Provision the managed Postgres database
You have two choices for the database, and this is the first real decision.
Option A: A container inside Dokploy. Dokploy can run Postgres as a one-click database on the droplet itself. It is free and fast to set up. The catch is that backups, failover, and disk management are entirely your problem, and the database competes with your app for the droplet’s RAM.
Option B: A DigitalOcean Managed Database. This runs Postgres outside the droplet as a managed service with automated daily backups, point-in-time recovery (restores spin up a new cluster), and connection pooling. It starts at $15/month for a single node.
I chose the managed database. For a real app with real user data, automated backups alone are worth $15. Losing patient records because I forgot to configure a backup job is not a risk I want to own. (If you are on sign-up credit, it applies to managed databases too, so you can try the managed route before it costs you anything.)
Create it from the DigitalOcean console under Databases, Create Database Cluster. (Some Marketplace images offer to attach a managed database during droplet creation, but the stock Ubuntu flow does not - the Databases section is the reliable path, and it is the one I used.)
To set it up, choose PostgreSQL and pick the same region as your droplet so traffic stays on the internal network. Once it provisions:
- Go to the database’s Settings and add your droplet to Trusted Sources. This is a firewall rule. Until you do this, every connection is refused, and it is the number-one reason a first deploy fails to reach the database.
- Copy the connection string from the Connection Details panel. DigitalOcean gives you a few formats; for .NET, the Npgsql keyword format is the one to use, because it lets you add pooling and timeout settings cleanly. This is the exact shape that worked for me:
Host=private-dbaas-db-0000000-do-user-0000000-0.a.db.ondigitalocean.com;Port=25060;Database=mydentalapp_demo;Username=doadmin;Password=your-password;SSL Mode=Require;Trust Server Certificate=true;Maximum Pool Size=40;Timeout=15;Command Timeout=30Four parts of that string matter for a managed database:
- The
private-host. DigitalOcean gives you both a public and a private hostname. Use the private one (it starts withprivate-) so database traffic stays on DigitalOcean’s internal network and never crosses the public internet. It is faster and one less thing exposed. SSL Mode=Require;Trust Server Certificate=true. Managed Postgres enforces SSL. Since Npgsql 8,SSL Mode=Requireencrypts the connection but does not validate the server certificate at all, soTrust Server Certificate=trueis only there for compatibility with older Npgsql versions, where leaving it out fails with a certificate validation error. If you want the certificate actually validated, useSSL Mode=VerifyFulland point Npgsql at DigitalOcean’s CA certificate from the connection panel.Maximum Pool Size=40. Managed Postgres has a connection limit tied to the plan. Capping the pool keeps the API from exhausting it under load, and it is the number you watch on the database Insights tab from the monitoring section.Timeout=15;Command Timeout=30. Fifteen seconds to establish a connection and thirty for a single command, so a stuck query fails fast instead of hanging the request.
You paste this whole string into a single environment variable in the next step.
Step 6: Deploy the .NET Web API
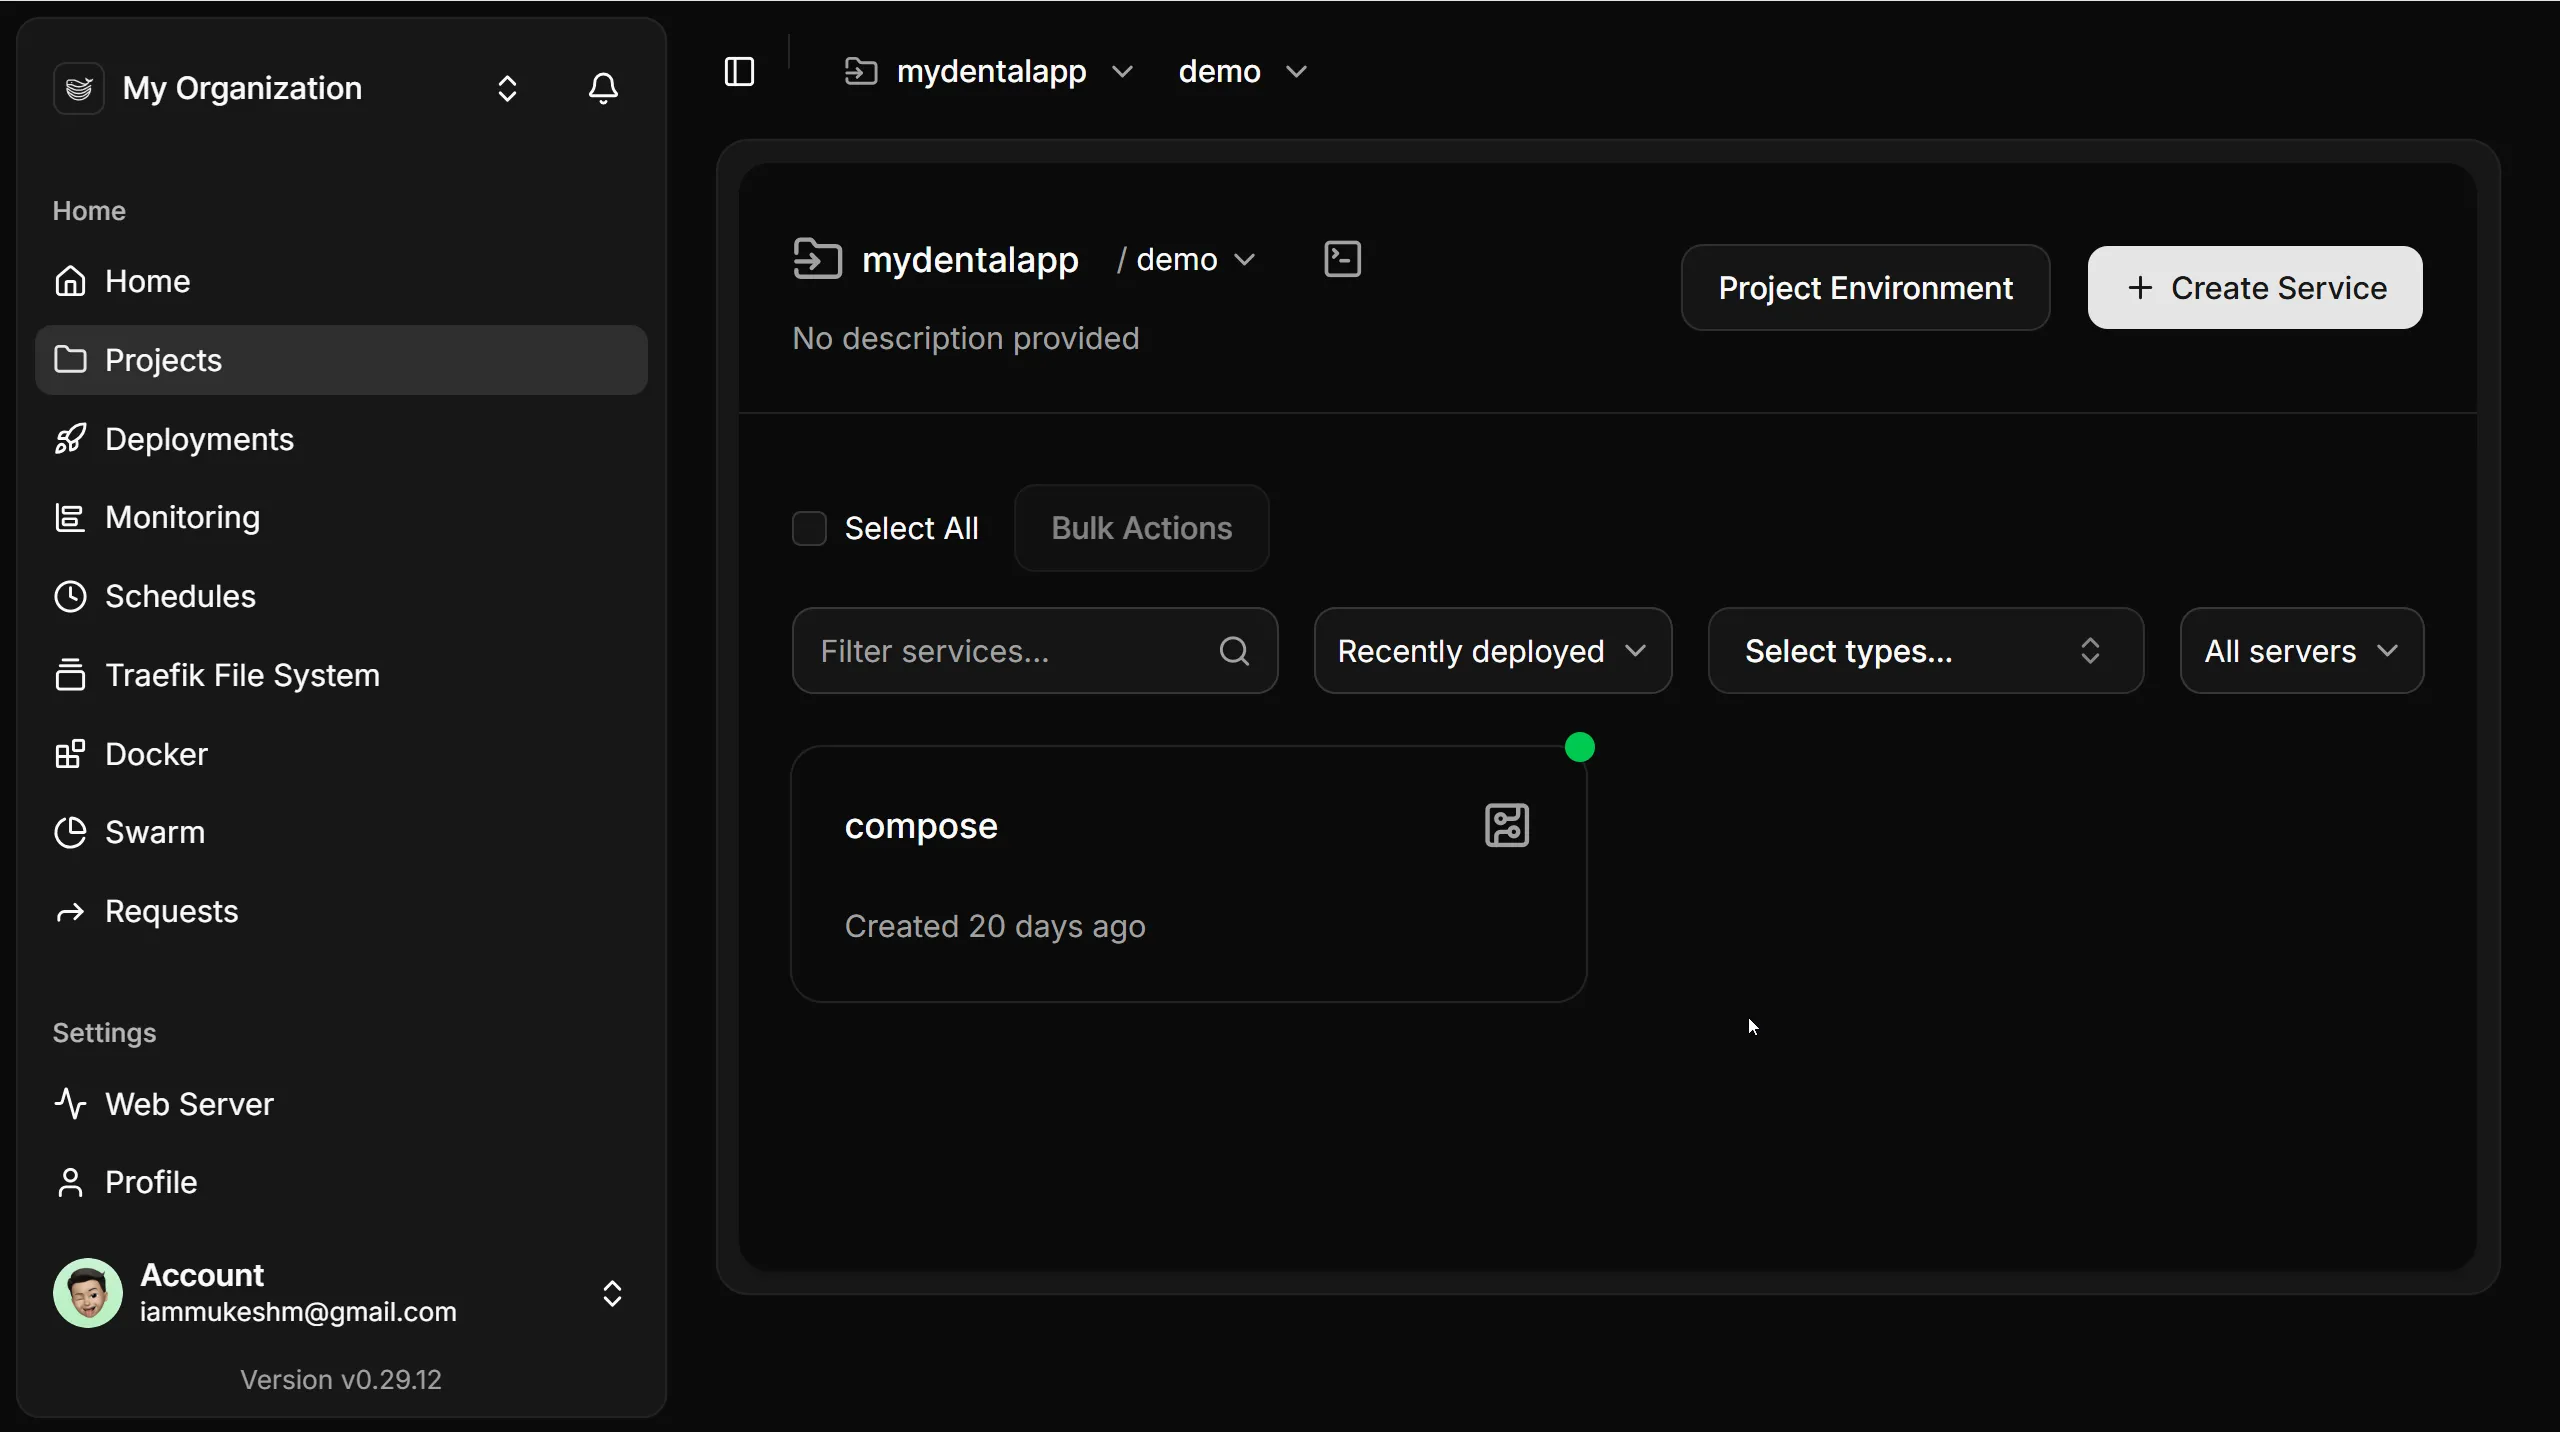
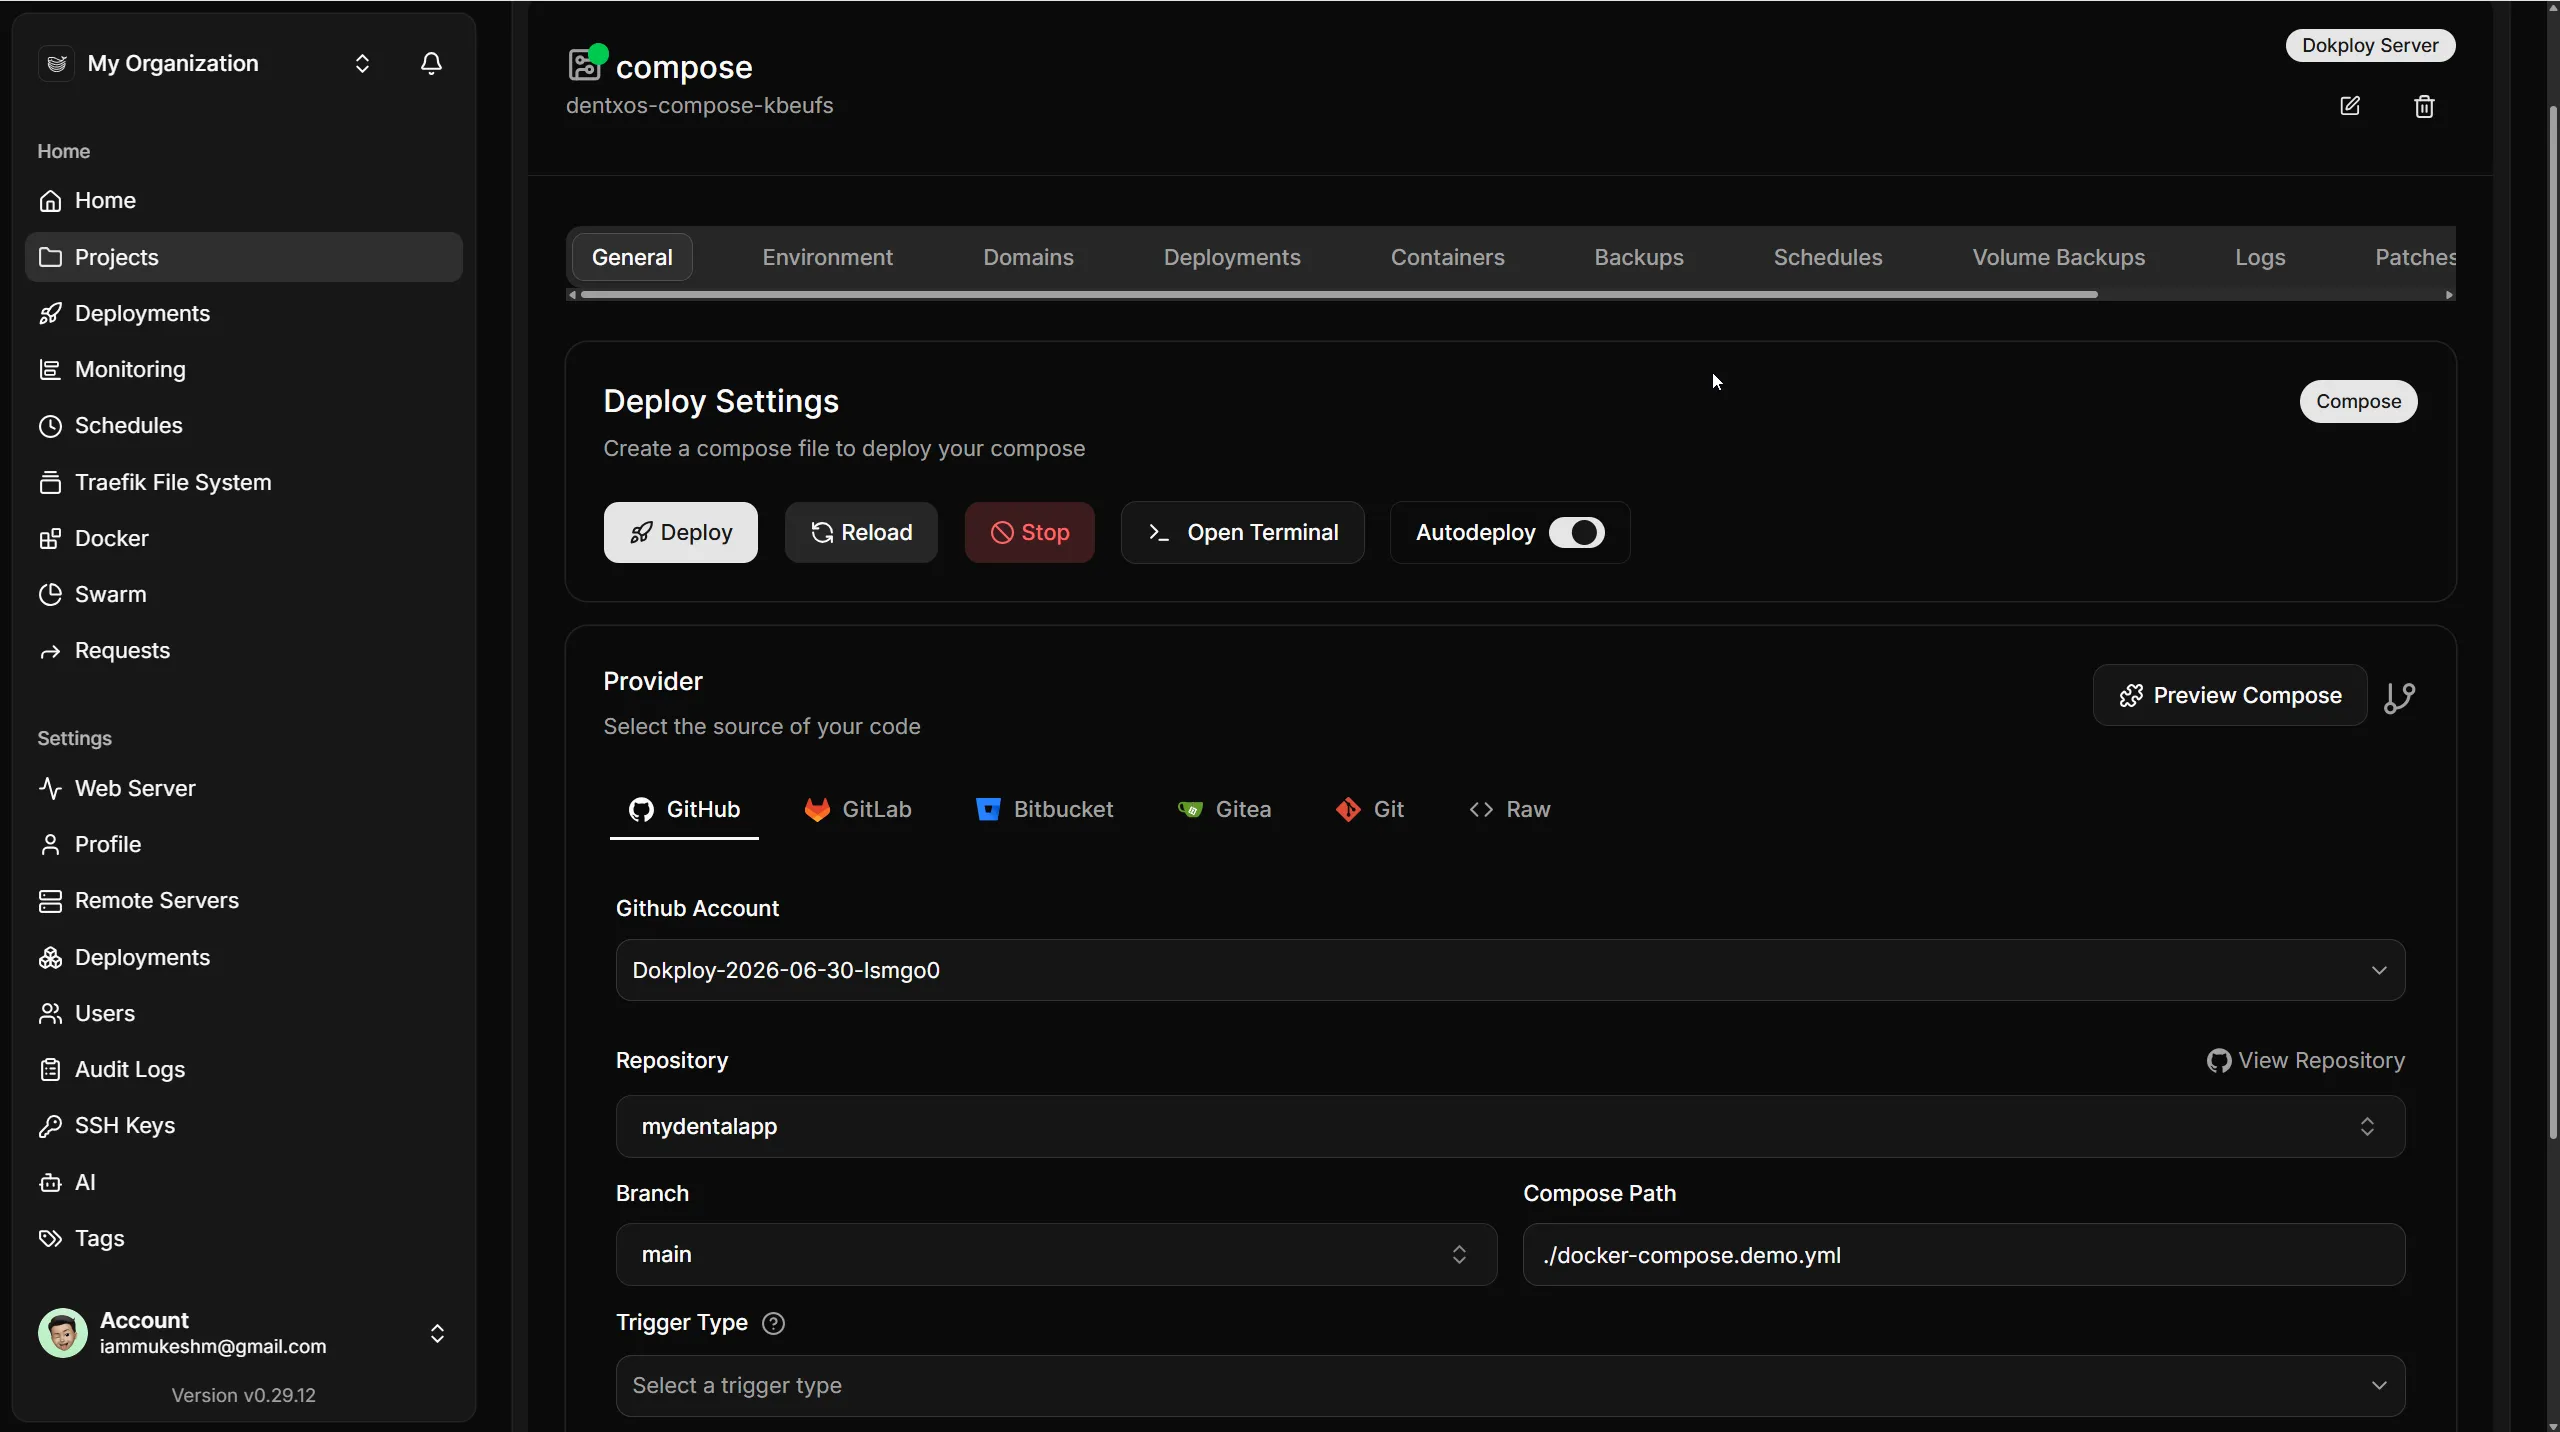
This is the core of the deployment. In your project, click Create Service - in Dokploy, everything you deploy is a service, and the type you pick decides how it runs. An Application builds and runs a single app from a Dockerfile; a Compose service runs a whole stack from a docker-compose file. I selected Compose, because my API, both React frontends, and the Valkey cache are all defined in one compose file - the full file is later in this article, and this step focuses on the API piece of it. Set the source to GitHub using the provider you connected in Step 4, pick the repository, choose the branch (main), and point the Compose Path at your compose file. If you are deploying just a single API, choosing Application with the Build Type set to Dockerfile is the simpler path, and everything below still applies.
Your API needs a Dockerfile. This is the actual multi-stage build I run in production, not a stripped-down example. It is a few lines longer than the minimal version, and every extra line earns its place:
# syntax=docker/dockerfile:1# Build from the repo root so ProjectReferences resolve:#   docker build -f src/MyDentalApp.Api/Dockerfile .
ARG DOTNET_VERSION=10.0
FROM mcr.microsoft.com/dotnet/sdk:${DOTNET_VERSION} AS buildWORKDIR /src
COPY Directory.Packages.props ./COPY src/ src/
RUN --mount=type=cache,target=/root/.nuget/packages \    dotnet publish src/MyDentalApp.Api/MyDentalApp.Api.csproj \        -c Release \        -o /app/publish \        /p:UseAppHost=false
FROM mcr.microsoft.com/dotnet/aspnet:${DOTNET_VERSION} AS runtimeWORKDIR /app
# curl for Docker HEALTHCHECK. tini forwards signals correctly so SIGTERM from# Dokploy/Traefik results in a graceful Kestrel shutdown instead of a hard kill.RUN apt-get update \    && apt-get install -y --no-install-recommends curl tini \    && rm -rf /var/lib/apt/lists/*
RUN mkdir -p /var/mydentalapp/dp-keys \    && chown -R app:app /var/mydentalapp
COPY --from=build --chown=app:app /app/publish .USER app
ENV ASPNETCORE_URLS=http://+:8080 \    ASPNETCORE_ENVIRONMENT=Production \    DOTNET_RUNNING_IN_CONTAINER=true \    DOTNET_EnableDiagnostics=0
EXPOSE 8080
HEALTHCHECK --interval=30s --timeout=5s --start-period=40s --retries=3 \    CMD curl -fsS http://localhost:8080/alive || exit 1
ENTRYPOINT ["/usr/bin/tini", "--", "dotnet", "MyDentalApp.Api.dll"]
The parts that go beyond a basic build, and why they are there:
- Build from the repo root. The build context is the whole repo, so project references and central package management (
Directory.Packages.props) resolve. The-fflag points at the Dockerfile inside the API project. - NuGet cache mount.
--mount=type=cachekeeps restored packages between builds and cuts build time once you are iterating. - Non-root user. The runtime stage copies the published output as the built-in
appuser and switches to it withUSER app. Nothing runs as root. - tini as the entrypoint. When Dokploy redeploys, Traefik sends the container a SIGTERM.
tiniforwards that signal so Kestrel shuts down gracefully instead of being hard-killed mid-request. - A real healthcheck. Docker polls
/aliveso an unhealthy container is visible instead of silently serving errors. - Persisted Data Protection keys. I create
/var/mydentalapp/dp-keysand mount a Dokploy volume there. Without a stable key path, ASP.NET Core regenerates its Data Protection keys on every redeploy, which invalidates every auth cookie and antiforgery token. Persisting them keeps users logged in across deploys. One thing to know: ASP.NET Core does not pick the path up from configuration on its own - wire it inProgram.cswithbuilder.Services.AddDataProtection().PersistKeysToFileSystem(new DirectoryInfo(keyRingPath)), reading the path from your config.
If you would rather not maintain a Dockerfile at all, .NET can build a container image straight from the SDK with dotnet publish. For a real app I want this level of control.
The port still matters. Since .NET 8, ASP.NET Core containers listen on port 8080 (the ASPNETCORE_URLS line pins it explicitly). In Dokploy, set the application’s exposed port to 8080. Getting this wrong produces a 502 from Traefik with no obvious cause, and it is one of the most common first-deploy mistakes.
Next, the environment variables. This is where the demo and production split earns its keep. Every application in Dokploy has its own Environment tab where you paste key-value pairs, one per line, and each environment keeps its own set of values. So the API in demo gets its demo connection string while the same API in production gets the managed Postgres one, all without changing a line of code. At minimum, the API needs:
DATABASE_CONNECTION_STRING=Host=private-dbaas-db-0000000-do-user-0000000-0.a.db.ondigitalocean.com;Port=25060;Database=mydentalapp_demo;Username=doadmin;Password=your-password;SSL Mode=Require;Trust Server Certificate=true;Maximum Pool Size=40;Timeout=15;Command Timeout=30ASPNETCORE_ENVIRONMENT=ProductionIn Program.cs, read that single variable and hand it to Npgsql:
var connectionString = builder.Configuration["DATABASE_CONNECTION_STRING"];
builder.Services.AddDbContext<AppDbContext>(options =>    options.UseNpgsql(connectionString));
.NET loads environment variables straight into configuration, so the flat DATABASE_CONNECTION_STRING key is available immediately. For nested settings I use the double-underscore convention instead - ConnectionStrings__Cache becomes ConnectionStrings:Cache, and you will see FILESTORAGE__ENDPOINT map to FileStorage:Endpoint in the storage step.
A few things worth knowing about how Dokploy handles these variables:
- They are injected at runtime. Changing a variable requires a redeploy of that service before the new value takes effect.
- Secrets belong here, not in your repo. Database passwords, the Cloudflare R2 keys, JWT signing keys - all of it lives in the Environment tab, never committed to
appsettings.json. This is the whole point of environment variables: the same image ships everywhere, and the secrets are supplied by the environment. - Shared values can be defined once. For settings common to several services, Dokploy supports project-level shared variables that you reference from each app instead of pasting the same value into every service.
That connection string is the minimum to boot. A real app needs more. Here is the actual set of variables I added to the demo environment, grouped by purpose (the # comments are just for readability):
# App + demo behaviourASPNETCORE_ENVIRONMENT=StagingDEMO__ENABLED=trueDEMO__ALLOWADHOCTENANTS=trueCOMMS__ALLOWSIMULATEDSENDERS=falseIMAGE_TAG=edgeSECURITY__TWOFACTOR__ISSUER=MyDentalApp (Demo)
# Routing + TLS (Traefik / Dokploy)URL_SCHEME=httpsTRAEFIK_ENTRYPOINT=websecureTRAEFIK_TLS=trueTRAEFIK_CERTRESOLVER=letsencryptAPI_DOMAIN=api-demo.mydentalapp.comAPP_DOMAIN=app-demo.mydentalapp.comADMIN_DOMAIN=admin-demo.mydentalapp.com
# DatabaseDATABASE_CONNECTION_STRING=Host=private-dbaas-db-0000000-do-user-0000000-0.a.db.ondigitalocean.com;Port=25060;Database=mydentalapp_demo;Username=doadmin;Password=your-password;SSL Mode=Require;Trust Server Certificate=true;Maximum Pool Size=40;Timeout=15;Command Timeout=30
# Auth (JWT + refresh tokens)JWT__ISSUER=https://api-demo.mydentalapp.comJWT__AUDIENCE=mydentalappJWT__SECRETKEY=your-base64-encoded-secretJWT__EXPIRYMINUTES=15REFRESHTOKEN__EXPIRYDAYS=7
# File storage (Cloudflare R2, S3-compatible)FILESTORAGE__ENDPOINT=https://<account-id>.r2.cloudflarestorage.comFILESTORAGE__ACCESSKEY=your-r2-access-keyFILESTORAGE__SECRETKEY=your-r2-secret-keyFILESTORAGE__BUCKETNAME=mydentalapp-demoFILESTORAGE__PUBLICENDPOINT=https://<account-id>.r2.cloudflarestorage.comFILESTORAGE__REGION=autoFILESTORAGE__PRESIGNEDUPLOADEXPIRY=00:15:00FILESTORAGE__PRESIGNEDDOWNLOADEXPIRY=01:00:00FILESTORAGE__MAXFILESIZEBYTES=52428800FILESTORAGE__ALLOWEDCONTENTTYPES=image/jpeg,image/png,image/webp,application/pdf
# Observability (OpenTelemetry - blank in demo)OTEL_EXPORTER_OTLP_ENDPOINT=OTEL_EXPORTER_OTLP_HEADERS=OTEL_EXPORTER_OTLP_PROTOCOL=
# Health checksHEALTHCHECKS__APIKEY=your-healthcheck-key
A few things this set shows:
- It is environment-specific. This is the demo copy, so it runs as
Staging, points at the demo database, and usesadmin-demo.mydentalapp.com. My production environment holds the same keys with production values:ASPNETCORE_ENVIRONMENT=Production, the production database,admin.mydentalapp.com, and real credentials. That separation is the whole reason the two Dokploy environments exist. - Some keys belong to later steps.
FILESTORAGE__*is the Cloudflare R2 config from Step 8, and theTRAEFIK_*and*_DOMAINvalues feed routing and TLS from Step 10. IMAGE_TAGpicks the build. Demo runs theedgetag while production runs a pinned release tag, which pairs with the GitHub Actions build in Step 11.- Every secret here is a placeholder. Swap in your own database password, JWT signing key, and R2 keys, and never commit the real values to the repo.
Click Deploy. Dokploy clones the repo, runs the Dockerfile, and starts the container. Watch the build logs stream in the dashboard. When it finishes, your API is live inside the droplet. You will give it a public domain in Step 10.
Environment-Based Configuration in ASP.NET Core
How ASP.NET Core layers configuration and reads environment variables. Essential for managing secrets across environments.
Step 7: Run Valkey as a caching container
Valkey is an open-source, in-memory key-value store forked from Redis under the Linux Foundation after Redis changed its license in 2024. It is a drop-in replacement, so every Redis client library works against it unchanged.
Rather than pay for a managed cache, I run Valkey as a container. In Dokploy, create a new Database (or a Docker Compose service) using the valkey/valkey:9 image. Once it starts, it is reachable from your API over the internal Docker network by its service name, on port 6379. No public port, no SSL, no extra cost.
In the .NET API, connect with StackExchange.Redis, which speaks the Valkey protocol:
builder.Services.AddStackExchangeRedisCache(options =>{ options.Configuration = builder.Configuration.GetConnectionString("Cache");});Then set the connection string as another environment variable, pointing at the internal service name:
ConnectionStrings__Cache=valkey:6379In a .NET 10 API, I usually put HybridCache in front of Valkey so hot reads hit an in-process layer before touching the network. Because the cache lives on the internal network, it never touches the public internet. That is the whole reason a container is fine here: a cache holds nothing you cannot rebuild, and keeping it private means one less attack surface.
Distributed Caching in ASP.NET Core with Redis
The caching patterns in this article apply directly to Valkey, since it is protocol-compatible with Redis.
Step 8: Wire up Cloudflare R2 for file storage
My app stores documents and images. Putting those on the droplet’s disk is a mistake, because the disk is small, not backed up, and disappears if the droplet is rebuilt. Object storage is the right home for uploads.
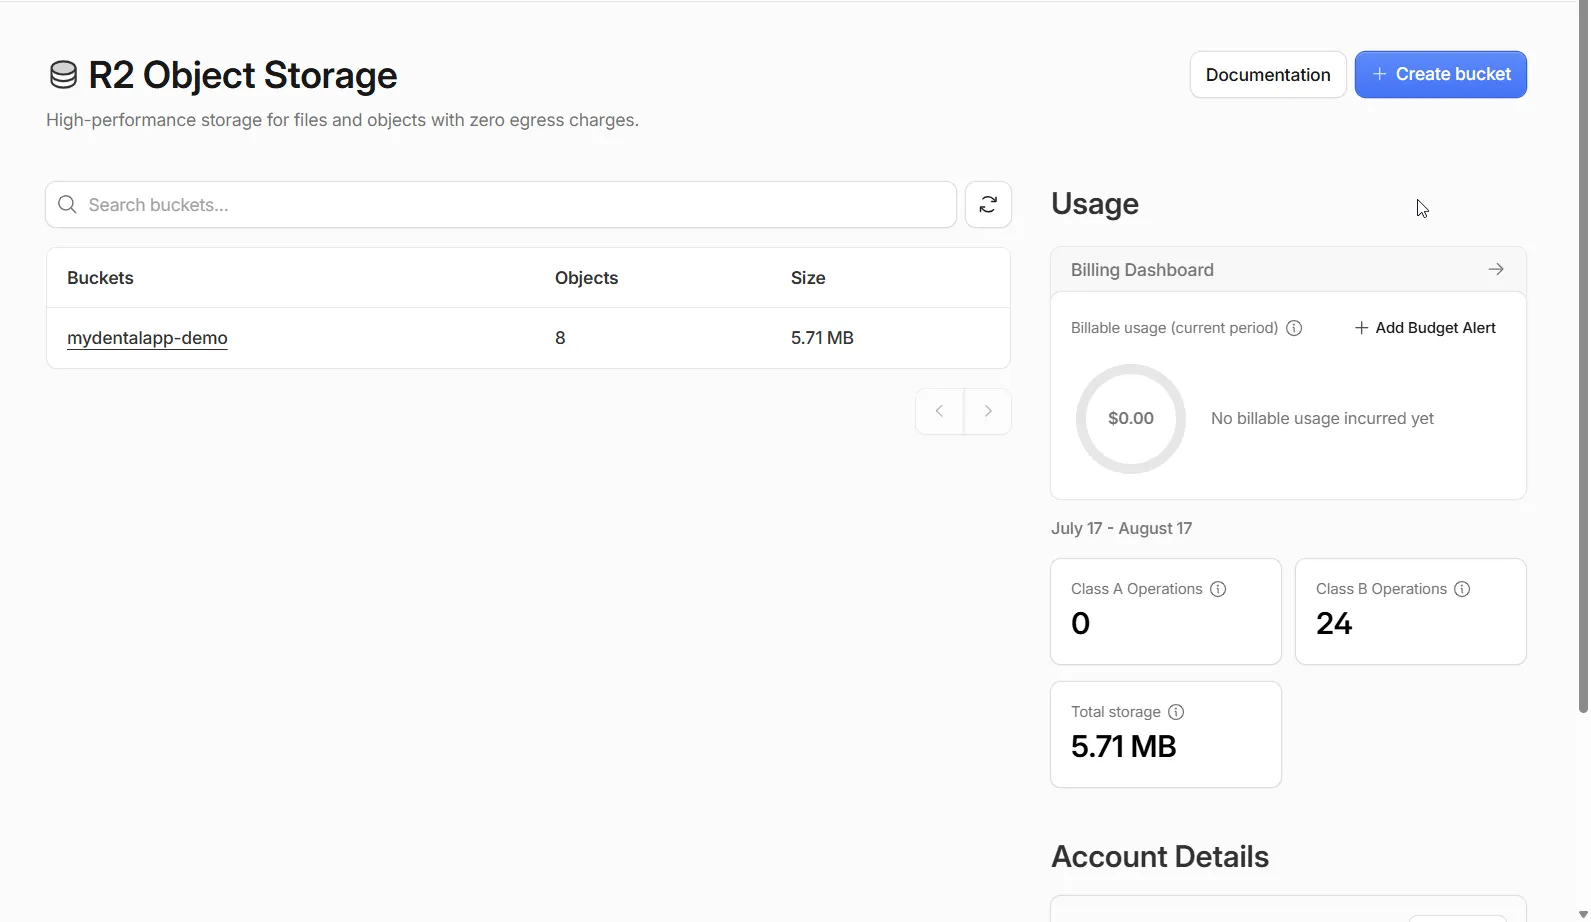
I chose Cloudflare R2 over DigitalOcean Spaces or Amazon S3 for one reason: zero egress fees. Every file a user downloads is free bandwidth, which matters for a document-heavy app. R2 is S3-compatible, so the AWS SDK for .NET works against it directly.
In the Cloudflare dashboard, create an R2 bucket and generate an API token with read and write access. You get an access key ID, a secret access key, and an account-specific endpoint.
Configure the S3 client to point at R2:
var config = new AmazonS3Config{    ServiceURL = builder.Configuration["FileStorage:Endpoint"],    ForcePathStyle = true,    // Newer AWS SDKs send CRC32 checksums by default; R2 rejects them:    DisableDefaultChecksumValidation = true};
builder.Services.AddSingleton<IAmazonS3>(    new AmazonS3Client(        builder.Configuration["FileStorage:AccessKey"],        builder.Configuration["FileStorage:SecretKey"],        config));
Add the R2 credentials as environment variables in Dokploy, the same way you added the database connection string. These are the FILESTORAGE__* keys from the full environment block above, and the double underscore maps each one to FileStorage:... in configuration:
FILESTORAGE__ENDPOINT=https://<account-id>.r2.cloudflarestorage.comFILESTORAGE__ACCESSKEY=your-r2-access-keyFILESTORAGE__SECRETKEY=your-r2-secret-keyFILESTORAGE__BUCKETNAME=mydentalapp-demoFILESTORAGE__REGION=autoForcePathStyle = true keeps the SDK on path-style URLs, which is the addressing style Cloudflare’s own examples use. The settings that actually bite are the integrity ones: AWS SDK releases since early 2025 add CRC32 checksums and streaming signatures to uploads by default, and R2 rejects both. DisableDefaultChecksumValidation = true on the config, plus DisablePayloadSigning = true on upload requests, is Cloudflare’s documented fix - without them, uploads fail even though your credentials are correct.
Configure CORS on the bucket
One more R2 setting that is easy to miss. In my app, files never flow through the API. The API only generates presigned URLs, and the browser uploads and downloads directly against R2. That direct browser-to-R2 call is a cross-origin request, so the bucket itself has to allow the frontend origins. Skip this and everything looks fine on the server: presigning succeeds, credentials are valid, and then the actual upload dies in the browser with a CORS error.
In the bucket’s Settings, add a CORS policy that allows both frontends:
[ { "AllowedOrigins": [ "https://app.mydentalapp.com", "https://admin.mydentalapp.com" ], "AllowedMethods": ["GET", "PUT", "HEAD"], "AllowedHeaders": ["*"], "ExposeHeaders": ["ETag"], "MaxAgeSeconds": 3600 }]PUT covers presigned uploads, GET covers downloads, and exposing ETag lets the frontend read the upload response. Each environment’s bucket gets its own policy with its own origins - the demo bucket allows the -demo domains. Note that this is separate from the API’s CORS policy in Step 9: that one lets the browser call the API, this one lets the browser touch the bucket. You need both, and only the browser cares - the API’s own S3 calls are server-to-server, where CORS does not apply.
Working with Amazon S3 in ASP.NET Core
The S3 client patterns here transfer to R2 unchanged, since R2 implements the S3 API.
Step 9: Deploy the React frontends
My SaaS has two React frontends: the clinic app the dentists log into, and a separate platform-admin app I use to create tenants and manage billing. Each one is its own application in the same Dokploy project. This is where running your own PaaS pays off. On a managed platform, two frontends can mean two billable projects; on Dokploy, they are just two more containers on the same droplet at no extra cost.
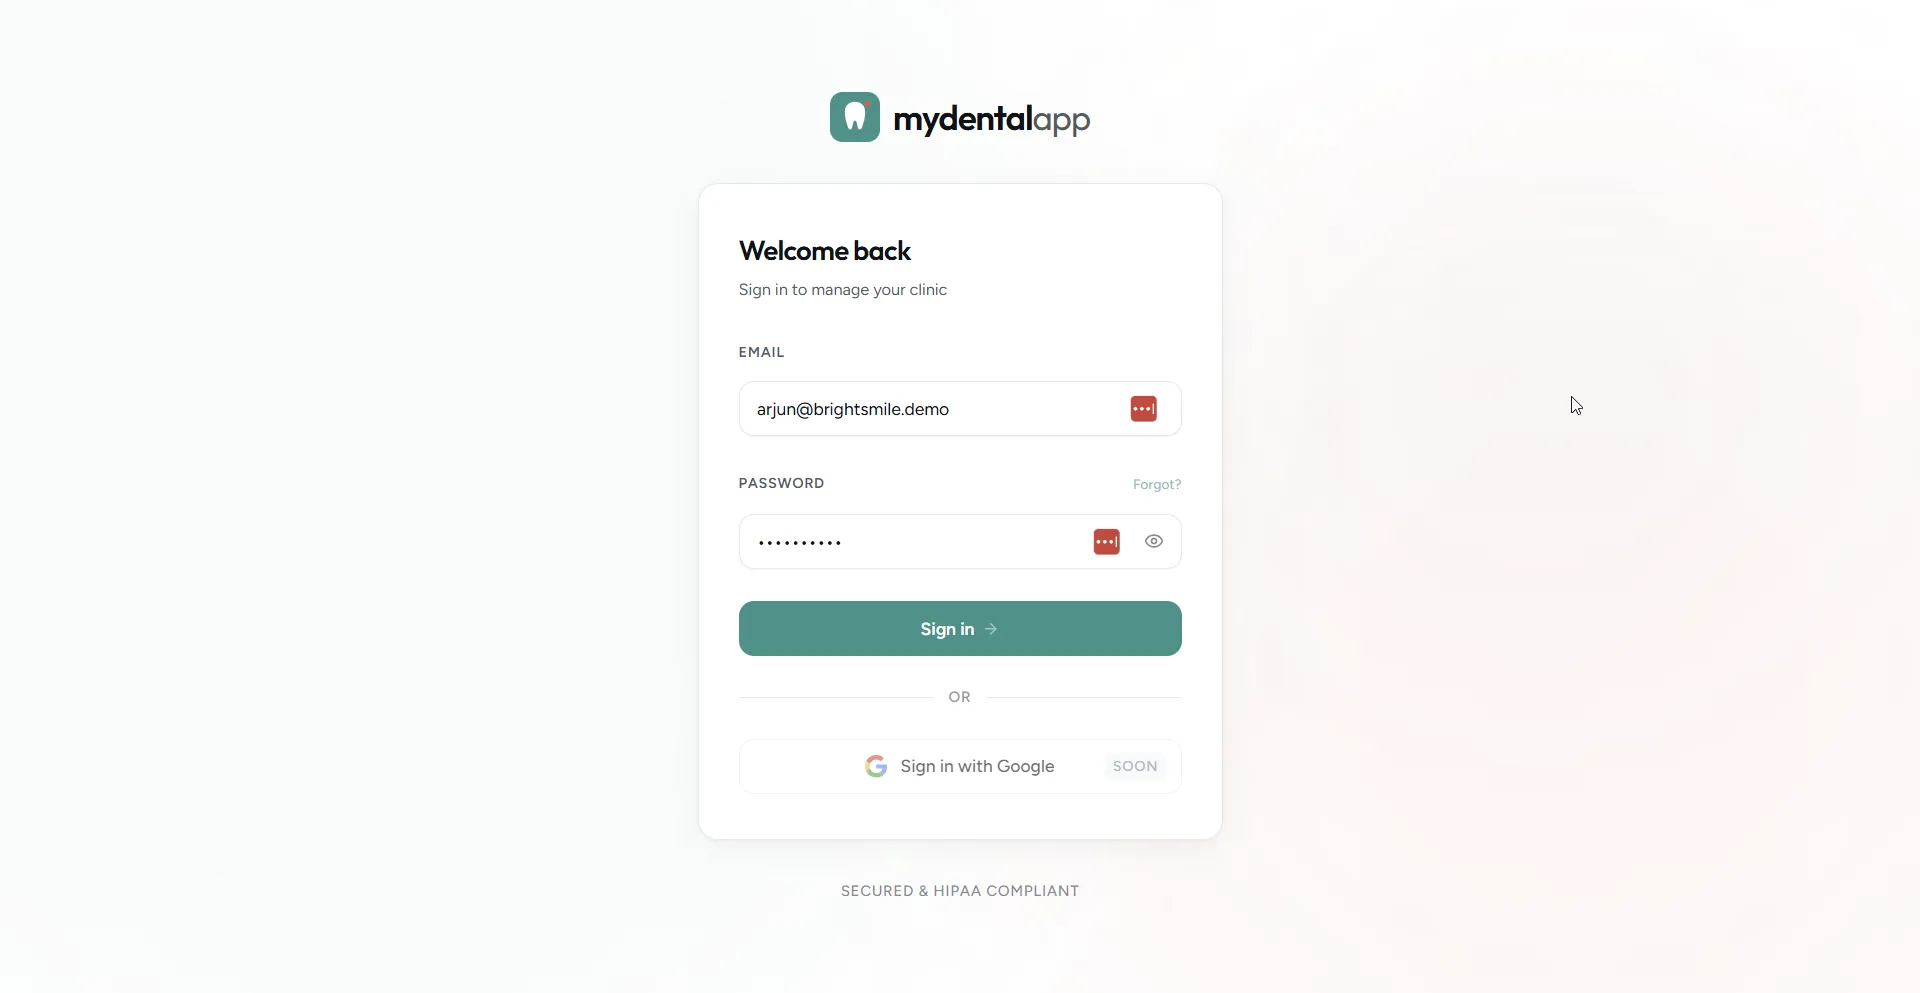
Create a new Application for each, point it at its GitHub repo, and build with a Node stage that compiles the React app, then serve the static output from Nginx. This is the real Dockerfile for the clinic app:
# syntax=docker/dockerfile:1# Build from this directory:#   docker build -t mydentalapp-app clients/app## Build-once, run-anywhere: the API origin is NOT baked at build time. It is# resolved at runtime from /config.js, which the nginx entrypoint# (docker-entrypoint.d/40-runtime-config.sh) writes from container env on# startup. One image serves demo + prod; configure via Dokploy env (API_BASE_URL).
ARG NODE_VERSION=24-alpineARG NGINX_VERSION=1.30-alpine
FROM node:${NODE_VERSION} AS buildWORKDIR /app
COPY package.json package-lock.json* ./RUN --mount=type=cache,target=/root/.npm \    if [ -f package-lock.json ]; then npm ci --legacy-peer-deps; else npm install --legacy-peer-deps; fi
COPY . .
# No VITE_API_BASE_URL build arg: the origin is injected at runtime (see header).RUN npm run build
FROM nginx:${NGINX_VERSION} AS runtimeCOPY nginx.conf /etc/nginx/conf.d/default.confCOPY --from=build /app/dist /usr/share/nginx/html
# Runtime config generator - writes /config.js from container env at startup.# The base nginx entrypoint runs /docker-entrypoint.d/*.sh before launching nginx.COPY docker-entrypoint.d/40-runtime-config.sh /docker-entrypoint.d/40-runtime-config.shRUN chmod +x /docker-entrypoint.d/40-runtime-config.sh
EXPOSE 80CMD ["nginx", "-g", "daemon off;"]
The admin app’s Dockerfile is identical apart from the build tag (mydentalapp-admin).
The interesting part is what this Dockerfile does not do. A naive React build bakes the API URL in at build time with a VITE_API_URL variable, which forces a separate image per environment. Mine does not. The API origin is injected at runtime: a small entrypoint script writes the value from the container’s environment into a /config.js file that the app reads on load. One image runs in both demo and production, and the only difference is the API_BASE_URL I set in each Dokploy environment. This is the frontend half of the same runtime-config idea that keeps the demo and production split clean.
The API also has to allow both frontend origins, or the browser blocks every request with a CORS error. In the API, configure CORS to permit both domains:
builder.Services.AddCors(options =>{    options.AddDefaultPolicy(policy =>        policy.WithOrigins(                  "https://app.mydentalapp.com",                  "https://admin.mydentalapp.com")              .AllowAnyHeader()              .AllowAnyMethod());});
// after building the appapp.UseCors();
CORS was the gotcha that cost me the most time. The apps work perfectly on localhost, then the moment they are on separate domains, every call fails. The fix is always the same: add each exact frontend origin, including https://, to the allowed origins. With two frontends, forgetting the second origin is an easy way to lose an afternoon.
CORS in ASP.NET Core
A full breakdown of CORS policies, common errors, and how to configure them correctly for a separate frontend.
Step 10: Add domains and automatic SSL
My domain is on Cloudflare, so DNS lives there. In the Cloudflare dashboard, create three A records pointing at the droplet’s IP. I use subdomains rather than the apex:
app.mydentalapp.comfor the clinic React app.admin.mydentalapp.comfor the platform-admin React app.api.mydentalapp.comfor the .NET API.
Here is the one ordering gotcha with Cloudflare. Dokploy issues Let’s Encrypt certificates through Traefik using an HTTP challenge, and with Cloudflare’s proxy (the orange cloud) on, that challenge can fail: rules like Always Use HTTPS can intercept the validation request before it reaches Traefik, and Full (strict) SSL mode dead-ends with a 526 while the origin has no certificate yet. So set each record to DNS only (grey cloud) first, let the certificate issue, then switch the proxy back on. (The long-term alternative is Traefik’s DNS challenge with a Cloudflare API token, which works with the proxy on, but grey-clouding once is the simpler path.) I cover why you want the proxy on in the security section below.
In Dokploy, open each application’s Domains tab, add the matching hostname, and enable HTTPS with Let’s Encrypt. Within a minute of DNS resolving, all three apps serve over HTTPS with no manual certificate handling.
If the certificate does not issue, it is almost always DNS or the proxy. Confirm the record resolves to the droplet with dig app.mydentalapp.com and that the record is grey-clouded before assuming Traefik is broken.
Step 11: Move builds to GitHub Actions
The simplest way to get continuous deployment is Dokploy’s built-in webhook: enable Auto Deploy, copy the webhook URL, and add it to your GitHub repository under Settings, Webhooks. Every push then rebuilds the container on the droplet automatically.
That is where I hit my biggest real problem. On the 2 vCPU / 4 GB droplet, every build pinned the CPU. The DigitalOcean monitoring graph showed 90% CPU spikes during each deploy, and while a build ran, the live app slowed down for real users. Building a .NET image is CPU-heavy, and doing it on the same box that serves traffic is a bad trade.
The fix was to move the build off the droplet entirely. Instead of Dokploy building from the Dockerfile, I build the image in GitHub Actions, push it to the GitHub Container Registry, and have Dokploy deploy the prebuilt image. The droplet now only pulls and runs, which is cheap.
Here is the workflow that builds and pushes on every push to main:
name: build-and-pushon: push: branches: [main]jobs: build: runs-on: ubuntu-latest permissions: contents: read packages: write steps: - uses: actions/checkout@v7 - uses: docker/login-action@v4 with: registry: ghcr.io username: ${{ github.actor }} password: ${{ secrets.GITHUB_TOKEN }} - uses: docker/build-push-action@v7 with: context: . file: src/MyDentalApp.Api/Dockerfile push: true tags: ghcr.io/your-username/mydentalapp-api:latestThen in Dokploy, change the application’s source from Dockerfile to Docker (registry image), point it at ghcr.io/your-username/mydentalapp-api:latest, and add a Deploy step at the end of the workflow that calls Dokploy’s API or webhook to pull the new image. The result is the same push-to-deploy experience, but the CPU-heavy work happens on GitHub’s runners for free, and the droplet stays responsive during deploys.
If you are on a small droplet, do this from day one. Building on a 2 vCPU box is fine for a hobby project, but the moment real users are hitting the app, you do not want a deploy competing with them for CPU.
The docker-compose file that ties it all together
The steps above walked through each piece one at a time so it is clear what every container does. You could run each as its own Dokploy Application, but as Step 6 mentioned, I deploy the whole stack as a single Compose service: one docker-compose file that Dokploy deploys as one unit. Everything is version-controlled and single-sourced, so demo and production cannot drift. This is that file.
I split it in two: a base file that defines the services, and a tiny per-environment file that just includes the base. Every difference between demo and production lives in the Dokploy environment variables from Step 6, never in the compose files. This is my docker-compose.base.yml, with comments stripped:
x-logging: &default-logging  driver: json-file  options:    max-size: "10m"    max-file: "3"
x-security: &default-security  security_opt:    - no-new-privileges:true
x-restart: &default-restart  restart: unless-stopped
services:  api:    image: ${IMAGE_PREFIX:-ghcr.io/mydentalapp}/mydentalapp-api:${IMAGE_TAG:-latest}    pull_policy: always    <<: [*default-restart, *default-security]    logging: *default-logging    stop_grace_period: 30s    environment:      ASPNETCORE_ENVIRONMENT: ${ASPNETCORE_ENVIRONMENT:-Production}      ASPNETCORE_URLS: http://+:8080      Demo__Enabled: ${DEMO__ENABLED:-false}      Demo__AllowAdhocTenants: ${DEMO__ALLOWADHOCTENANTS:-false}      Comms__AllowSimulatedSenders: ${COMMS__ALLOWSIMULATEDSENDERS:-false}      ConnectionStrings__mydentalapp: ${DATABASE_CONNECTION_STRING}      ConnectionStrings__cache: cache:6379      OTEL_EXPORTER_OTLP_ENDPOINT: ${OTEL_EXPORTER_OTLP_ENDPOINT:-}      HealthChecks__ApiKey: ${HEALTHCHECKS__APIKEY:-}      DataProtection__KeyRingPath: /var/mydentalapp/dp-keys      Jwt__Issuer: ${JWT__ISSUER:-MyDentalApp}      Jwt__Audience: ${JWT__AUDIENCE:-MyDentalApp}      Jwt__SecretKey: ${JWT__SECRETKEY}      Jwt__ExpiryMinutes: ${JWT__EXPIRYMINUTES:-5}      RefreshToken__ExpiryDays: ${REFRESHTOKEN__EXPIRYDAYS:-7}      Security__TwoFactor__Issuer: ${SECURITY__TWOFACTOR__ISSUER:-MyDentalApp}      FileStorage__Endpoint: ${FILESTORAGE__ENDPOINT}      FileStorage__PublicEndpoint: ${FILESTORAGE__PUBLICENDPOINT}      FileStorage__BucketName: ${FILESTORAGE__BUCKETNAME:-mydentalapp-documents}      FileStorage__AccessKey: ${FILESTORAGE__ACCESSKEY}      FileStorage__SecretKey: ${FILESTORAGE__SECRETKEY}      FileStorage__Region: ${FILESTORAGE__REGION:-auto}      FileStorage__ForcePathStyle: "true"      FileStorage__MaxFileSizeBytes: ${FILESTORAGE__MAXFILESIZEBYTES:-52428800}      Cors__AllowedOrigins__0: ${URL_SCHEME:-http}://${APP_DOMAIN:-app.mydentalapp.local}      Cors__AllowedOrigins__1: ${URL_SCHEME:-http}://${ADMIN_DOMAIN:-admin.mydentalapp.local}    volumes:      - mydentalapp-api-dp-keys:/var/mydentalapp/dp-keys    depends_on:      cache:        condition: service_healthy    networks:      - dokploy-network    healthcheck:      test: ["CMD", "curl", "-fsS", "http://localhost:8080/alive"]      interval: 30s      timeout: 5s      retries: 3      start_period: 40s    deploy:      resources:        limits:          memory: 1g          cpus: "1.5"        reservations:          memory: 256m    labels:      - traefik.enable=true      - traefik.docker.network=dokploy-network      - traefik.http.routers.mydentalapp-api.rule=Host(`${API_DOMAIN:-api.mydentalapp.local}`)      - traefik.http.routers.mydentalapp-api.entrypoints=${TRAEFIK_ENTRYPOINT:-web}      - traefik.http.routers.mydentalapp-api.tls=${TRAEFIK_TLS:-false}      - traefik.http.routers.mydentalapp-api.tls.certresolver=${TRAEFIK_CERTRESOLVER:-letsencrypt}      - traefik.http.services.mydentalapp-api.loadbalancer.server.port=8080
  dashboard:    image: ${IMAGE_PREFIX:-ghcr.io/mydentalapp}/mydentalapp-dashboard:${IMAGE_TAG:-latest}    pull_policy: always    <<: [*default-restart, *default-security]    init: true    logging: *default-logging    environment:      API_BASE_URL: ${URL_SCHEME:-http}://${API_DOMAIN:-api.mydentalapp.local}    networks:      - dokploy-network    deploy:      resources:        limits:          memory: 128m          cpus: "0.5"    labels:      - traefik.enable=true      - traefik.docker.network=dokploy-network      - traefik.http.routers.mydentalapp-app.rule=Host(`${APP_DOMAIN:-app.mydentalapp.local}`)      - traefik.http.routers.mydentalapp-app.entrypoints=${TRAEFIK_ENTRYPOINT:-web}      - traefik.http.routers.mydentalapp-app.tls=${TRAEFIK_TLS:-false}      - traefik.http.routers.mydentalapp-app.tls.certresolver=${TRAEFIK_CERTRESOLVER:-letsencrypt}      - traefik.http.services.mydentalapp-app.loadbalancer.server.port=80
  admin:    image: ${IMAGE_PREFIX:-ghcr.io/mydentalapp}/mydentalapp-admin:${IMAGE_TAG:-latest}    pull_policy: always    <<: [*default-restart, *default-security]    init: true    logging: *default-logging    environment:      API_BASE_URL: ${URL_SCHEME:-http}://${API_DOMAIN:-api.mydentalapp.local}      TENANT_APP_URL: ${URL_SCHEME:-http}://${APP_DOMAIN:-app.mydentalapp.local}      APP_URL: ${URL_SCHEME:-http}://${APP_DOMAIN:-app.mydentalapp.local}    networks:      - dokploy-network    deploy:      resources:        limits:          memory: 128m          cpus: "0.5"    labels:      - traefik.enable=true      - traefik.docker.network=dokploy-network      - traefik.http.routers.mydentalapp-admin.rule=Host(`${ADMIN_DOMAIN:-admin.mydentalapp.local}`)      - traefik.http.routers.mydentalapp-admin.entrypoints=${TRAEFIK_ENTRYPOINT:-web}      - traefik.http.routers.mydentalapp-admin.tls=${TRAEFIK_TLS:-false}      - traefik.http.routers.mydentalapp-admin.tls.certresolver=${TRAEFIK_CERTRESOLVER:-letsencrypt}      - traefik.http.services.mydentalapp-admin.loadbalancer.server.port=80
  cache:    image: valkey/valkey:9.1-alpine    <<: [*default-restart, *default-security]    init: true    logging: *default-logging    command: ["valkey-server", "--save", "60", "1", "--appendonly", "yes"]    volumes:      - mydentalapp-cache-data:/data    networks:      - dokploy-network    healthcheck:      test: ["CMD", "valkey-cli", "ping"]      interval: 10s      timeout: 3s      retries: 5    deploy:      resources:        limits:          memory: 256m          cpus: "0.5"
volumes:  mydentalapp-api-dp-keys:  mydentalapp-cache-data:
networks:  dokploy-network:    external: true
That one file is the whole stack. The parts worth calling out:
- Prebuilt images, not builds. Each service pulls
ghcr.io/.../*:${IMAGE_TAG}from the registry (Step 11), so the droplet never builds.IMAGE_TAGselects the release:edgefor demo, a pinned tag for production. - This is where the env variables land. The flat Dokploy variables from Step 6 map onto the .NET config keys here, each with a dev default so the same file runs locally.
DATABASE_CONNECTION_STRINGbecomesConnectionStrings__mydentalapp,FILESTORAGE__ACCESSKEYbecomesFileStorage__AccessKey, and so on. - Traefik labels do the routing and TLS. The
traefik.http.routers.*labels are what Step 10’s domains hook into. Traefik reads them off the container and issues the certificate, all driven by the*_DOMAINandTRAEFIK_*variables. - Every service is hardened and bounded.
no-new-privileges, per-service memory and CPU limits, log rotation, and healthchecks are set once via YAML anchors (x-security,x-logging) and reused, so nothing can starve the droplet or balloon its logs. - Named volumes persist what matters. The API’s Data Protection keys and Valkey’s data survive redeploys because they live in named volumes, not the container filesystem.
- The network is external.
dokploy-networkis Dokploy’s shared Traefik network; joining it is what makes the containers reachable.
The per-environment file is almost nothing. This is the entire docker-compose.demo.yml:
include: - docker-compose.base.ymlThat is the point. The demo file includes the base and adds nothing, because everything demo-specific is an environment variable in Dokploy, not a compose change. Production has an identical one-line file. In each Dokploy environment I set the Compose Path to the matching file, and the base guarantees demo and production run the exact same service definitions.
How to secure the deployment
A default Dokploy install is functional but exposed. Here is how I locked it down.
Hide the origin IP behind Cloudflare. With the domain on Cloudflare, turn the proxy back on (orange cloud) after the certificate is issued. Now visitors resolve to Cloudflare’s IPs, not your droplet. Your real server IP is hidden, which blocks direct-to-IP attacks and gives you Cloudflare’s DDoS protection and caching for free. Set the Cloudflare SSL mode to Full (strict) so the Cloudflare-to-droplet leg stays encrypted against your Let’s Encrypt certificate.
Add a DigitalOcean Cloud Firewall. Attach a firewall to the droplet that allows inbound 443 and 80 only from Cloudflare’s IP ranges, and 22 (SSH) only from your own IP. This means even if someone finds the origin IP, they cannot bypass Cloudflare to hit the app directly.
Lock down the Dokploy dashboard. The dashboard runs on port 3000, and by default it is reachable by anyone who knows the IP. Do not leave it open. Either block port 3000 in the firewall and reach it over an SSH tunnel, or put it behind its own proxied domain with authentication. An exposed deployment dashboard is a control panel for your entire server.
Put the admin app behind extra access control. The platform-admin app at admin.mydentalapp.com creates tenants and manages billing, so it is the highest-value target on the whole system. I do not leave it open to the public internet like the clinic app. Sit it behind Cloudflare Access (or a Cloudflare IP allowlist) so only I can reach the login page at all, and I added two-factor authentication on the admin account itself as a second layer. The clinic app needs to be public; the admin control plane does not, and treating them the same is a mistake. Network-level access control plus 2FA means a leaked password alone is not enough to touch billing or tenant data.
Keep SSH key-only. Disable password authentication on the droplet. Combined with the firewall rule limiting SSH to your IP, this closes the most common brute-force vector.
How do I monitor the droplet and database?
Once real users are on the app, you need to see what the server is doing. I use three layers of monitoring, and all of it is built in and free.
DigitalOcean droplet monitoring
Every droplet has a Graphs tab showing CPU, memory, disk, and bandwidth over time. Enable the free monitoring agent when you create the droplet, and the graphs fill in automatically. This is exactly how I caught the build problem from Step 11: the CPU graph showed a wall of 90% spikes lined up with each deploy, which told me the builds, not user traffic, were the load.
The graphs are useful, but you should not have to stare at them. Set up an alert policy under Monitoring: for example, email me if CPU stays above 80% for five minutes, or if disk usage crosses 85%. That turns monitoring from something you remember to check into something that tells you when it matters.
Managed database insights
The managed Postgres cluster has its own Insights tab with metrics the droplet graphs cannot show: connections in use, cache hit ratio, disk usage, and load on the database itself. The one I watch most is connections. Managed Postgres has a connection limit tied to the plan, and a misconfigured connection pool will exhaust it and start refusing queries. If the connection count creeps toward the cap, that is the signal to turn on pooling (DigitalOcean offers a built-in connection pool) before it becomes an outage.
Dokploy container stats and logs
Inside Dokploy, each application shows live CPU and memory usage per container plus streaming logs. When something misbehaves, this is the fastest place to look. The deployment logs stream the build and startup output, so a container that crash-loops on a bad environment variable shows the exception immediately instead of failing silently.
Between DigitalOcean’s host and database graphs and Dokploy’s per-container view, I can see the whole stack from one browser without installing Grafana or paying for an APM tool. For a small SaaS, that is enough.
My take: self-hosted PaaS vs managed PaaS
Dokploy is not always the right answer. Here is how I decide between a self-hosted PaaS and a fully managed one.
| Factor | Self-hosted PaaS (Dokploy) | Managed PaaS (App Platform, Render, Vercel) |
|---|---|---|
| Cost | Fixed droplet price, predictable | Usage-based, scales with traffic |
| Setup effort | You manage the server | Zero server management |
| Control | Full - SSH, custom services, any stack | Limited to what the platform allows |
| Scaling | Manual (resize droplet, add nodes) | Automatic |
| Best for | Solo devs, small SaaS, cost-sensitive projects | Teams that want to never touch infrastructure |
My rule: if you are a solo developer or a small team optimizing for cost and control, self-host with Dokploy. If your priority is never thinking about servers and you can absorb usage-based pricing, use a managed platform.
Dokploy vs Coolify
The two big self-hosted PaaS options are Dokploy and Coolify. Both run on a VPS, deploy from Git, and handle SSL through Traefik.
| Factor | Dokploy | Coolify |
|---|---|---|
| Launched | April 2024 | March 2021 |
| Feel | Lighter, faster UI, deployment-first | Feature-rich, more templates and options |
| One-click services | Solid catalog | 280+ (plus an MCP server since v4.1) |
| Maturity | Younger, fast-moving | More established, larger community |
| Best for | Simplicity and speed | Managing many services and teams |
I picked Dokploy because I wanted the fastest path from Git to a running container without a steep learning curve. If you are running many services across multiple servers, Coolify’s extra features earn their weight. For a single app on a single droplet, Dokploy is the cleaner choice.
The same setup on AWS, and why I did not use it
I know AWS well, and I still chose DigitalOcean for this. Here is the same architecture mapped to AWS services, and what each one costs:
| Piece | DigitalOcean + Dokploy | AWS equivalent | Rough AWS cost |
|---|---|---|---|
| Compute + orchestration | Droplet + Dokploy ($24) | EC2 + ECS/Fargate or App Runner | $30 to $60/mo |
| Load balancer + SSL | Included via Traefik | Application Load Balancer + ACM | ~$18/mo (just the ALB) |
| Database | Managed Postgres ($15) | RDS for PostgreSQL | $15 to $35/mo |
| Cache | Valkey container ($0) | ElastiCache | $12 to $15/mo |
| Object storage | Cloudflare R2 (~$0) | S3 + egress fees | Variable + egress |
| Private networking | Internal Docker network ($0) | NAT Gateway | ~$32/mo |
| Total | ~$40/mo | ~$110 to $170/mo |
The AWS bill is two to four times higher, and the cost is not even the main problem. The bigger cost is operational. On AWS, that same setup means IAM roles and policies, a VPC with public and private subnets, security groups, target groups, an ALB listener, and a NAT gateway just so a container can reach the internet. The ALB bills by the hour whether or not anyone visits, and the NAT gateway is a silent $32 line item that surprises every first-timer. S3 charges for egress, so a document-heavy app pays every time a user downloads a file.
For a small team without a dedicated DevOps person, that complexity is a tax you pay forever. DigitalOcean plus Dokploy gives you one dashboard, flat pricing, and an internal network that just works, and Cloudflare R2 removes egress fees entirely. AWS earns its complexity at scale, with many teams and strict compliance needs. Below that scale, it is mostly overhead. For a solo founder or a team of a few, self-hosting with Dokploy is cheaper to run and far cheaper to maintain.
What it actually costs
Here is the monthly bill for the setup in this guide, using published pricing:
| Service | What it does | Monthly cost |
|---|---|---|
| Droplet (4 GB / 2 vCPU) | Runs Dokploy, API, two React apps, Valkey | $24 |
| Managed Postgres (single node) | Relational data with backups | $15 |
| Valkey container | Caching (on the droplet) | $0 |
| Cloudflare R2 (light usage) | File storage, zero egress | ~$0 to $1 |
| Total | ~$40/month |
Drop to a 2 GB droplet and self-host Postgres as a container, and you can run the whole thing for around $12 to $15/month. That is the floor for a real, production-grade full-stack deployment. And if you create your DigitalOcean account through my referral link, the sign-up credit covers the first month or two of either setup, so you can prove it out before spending a dollar.
Clean Architecture in .NET
How I structure the .NET Web API that gets deployed here, so the codebase stays maintainable as it grows.
Key takeaways
- Dokploy turns any VPS into a self-hosted PaaS. One install command gives you Git deploys, automatic SSL, and push-to-deploy on infrastructure you own, for roughly a third of the AWS bill.
- Expose port 8080 for .NET containers. ASP.NET Core images listen on 8080 by default since .NET 8. Setting the wrong port is the most common cause of a 502 error.
- Build in CI, not on the droplet. Building .NET images on a 2 vCPU box spiked CPU to 90% and slowed the live app. Move builds to GitHub Actions and let Dokploy deploy the prebuilt image.
- Hide the origin behind Cloudflare and a firewall. Proxy DNS through Cloudflare to hide the droplet IP, restrict inbound traffic to Cloudflare’s ranges, and never leave the Dokploy dashboard on port 3000 open.
- Split managed and self-hosted by risk. Put the database on a managed node for backups; keep the cache as a free container because it is disposable.
- Cloudflare R2 beats S3 for file-heavy apps thanks to zero egress fees, and it is S3-compatible so the AWS SDK for .NET works unchanged.
Frequently Asked Questions
Can I host an ASP.NET Core app on a VPS instead of Azure App Service?
Yes. An ASP.NET Core app in a Docker container runs on any Linux VPS, and nothing in .NET 10 requires a managed host. App Service sells you the operational layer around the container: TLS certificates, reverse proxying, health checks, and redeploy on push. A self-hosted PaaS like Dokploy gives you that same layer on a VPS you rent for a flat monthly price. You take on patching, backups, and being on call in exchange.
How much does it cost to self-host a .NET app on a VPS?
The setup in this guide runs about $40 per month: a 4 GB DigitalOcean droplet, a managed Postgres node, and Cloudflare R2 for storage, with Valkey as a container rather than a paid managed service. The same architecture on AWS costs between $110 and $170 per month. The bigger difference is shape rather than size, because a VPS bill is flat and predictable while a managed-PaaS bill moves with traffic.
What is Dokploy and how is it different from Vercel or Netlify?
Dokploy is an open-source, self-hosted Platform as a Service that deploys apps and databases using Docker and Traefik. Unlike Vercel or Netlify, it runs on a server you own and control, so you pay a fixed VPS price instead of usage-based fees, and you can run any stack or custom service rather than being limited to the platform's supported runtimes.
Is Dokploy free?
Yes, self-hosting Dokploy is free. The core is open-source under Apache 2.0, with a paid cloud tier and a few proprietary enterprise features you will not need for a typical deployment. The only cost is the VPS or droplet it runs on. For a solo developer this is the cheapest way to get a modern deploy workflow with automatic SSL and push-to-deploy.
Do I need Docker knowledge to use Dokploy?
You should be comfortable writing a basic Dockerfile, since Dokploy builds and runs your app as a container. Beyond that, Dokploy handles the reverse proxy, SSL certificates, networking, and redeploys for you, so you do not need deep Docker operations experience.
How much RAM does a Dokploy droplet need?
Dokploy requires at least 2 GB of RAM and 30 GB of disk. A 2 GB droplet works for a single small app, but building .NET images while running multiple containers gets tight. A 4 GB droplet is comfortable and gives headroom during builds.
Can I deploy a .NET Web API and a React frontend on the same server?
Yes. Create two applications in the same Dokploy project, each with its own Dockerfile and domain. The API runs as a .NET container on port 8080 and the React app runs as a static build served by Nginx. Point a subdomain at each and Dokploy routes traffic to the correct container.
Should I use a DigitalOcean Managed Database or run the database in a container?
Use a managed database for any app with real user data, because it gives you automated backups, failover, and point-in-time recovery for around $15 per month. Run the database as a container only for hobby projects or when cost is the top priority and you accept managing backups yourself.
How does Dokploy handle SSL certificates?
Dokploy uses Traefik to request and renew Let's Encrypt certificates automatically. In each application's Domains tab, add your hostname and enable HTTPS with Let's Encrypt. As long as the domain resolves to the droplet, a certificate is issued within a minute and renewed automatically.
How do I set up automatic deployments on every git push?
Enable Auto Deploy in the application settings, copy the webhook URL Dokploy generates, and add it to your GitHub repository under Settings, Webhooks. Every push to the tracked branch then triggers Dokploy to rebuild the container and deploy the new version automatically.
Dokploy vs Coolify, which should I pick?
Pick Dokploy for a lightweight, deployment-first experience and the fastest path from Git to a running container, ideal for a single app on a single droplet. Pick Coolify if you manage many services or teams and want a larger template catalog and more advanced infrastructure features. Both are open-source and run on a VPS.
Why should I build in GitHub Actions instead of letting Dokploy build on the droplet?
Building a .NET image is CPU-heavy. On a small droplet, doing it on the same machine that serves traffic spikes CPU and slows the live app during every deploy. Building in GitHub Actions moves that work to free CI runners, pushes the finished image to a registry, and lets Dokploy just pull and run it, keeping the droplet responsive.
Is DigitalOcean with Dokploy cheaper than AWS for a small team?
Yes, usually two to four times cheaper. The same architecture on AWS needs an EC2 instance or Fargate, RDS, ElastiCache, an Application Load Balancer, a NAT gateway, and S3 with egress fees, which together run roughly $110 to $170 per month plus significant setup and maintenance. The DigitalOcean and Dokploy setup runs about $40 per month with far fewer moving parts.
Troubleshooting
- 502 Bad Gateway from Traefik. The exposed port is wrong. Set the .NET application’s port to 8080 in Dokploy, since ASP.NET Core containers listen there by default.
- Database connection refused. The droplet is not in the managed database’s Trusted Sources. Add it in the database Settings. If you instead get a certificate error, add
SSL Mode=Require;Trust Server Certificate=trueto the connection string. - SSL certificate not issuing. Either DNS has not propagated, or the Cloudflare proxy is on during issuance. Set the record to DNS only (grey cloud), confirm it resolves with
dig app.mydentalapp.com, let the certificate issue, then re-enable the proxy. - CORS errors in the browser. The API does not allow the frontend’s origin. Add the exact frontend URL, including
https://, to the CORS policy and callapp.UseCors(). - R2 uploads fail with a signature or checksum error. Newer AWS SDK versions send CRC32 checksums and streaming signatures that R2 rejects. Set
DisableDefaultChecksumValidation = trueon theAmazonS3ConfigandDisablePayloadSigning = trueon upload requests. - Build runs out of memory. A 2 GB droplet can exhaust RAM while building a .NET image. Resize to 4 GB during builds, or add swap.
Summary
Deploying a full-stack .NET app to your own server used to mean wrestling with Nginx configs, certbot, and systemd. Dokploy collapses all of that into a dashboard. I took a Claude-built .NET 10 Web API and two React frontends from a GitHub repo to a live, HTTPS-secured, auto-deploying production system on a single DigitalOcean droplet, with managed Postgres, a Valkey cache, and Cloudflare R2 for storage, for around $40 a month.
If you want to follow along, create a DigitalOcean account with my referral link to pick up the current sign-up credit and try the setup before committing real money. Once you have shipped one app this way, you will reach for it every time.

Claude Code for Beginners
The dental app in this guide was built with Claude Code. Here is how to get started with it for .NET development.
Happy Coding :)


What's your take?
Push back, share a war story, or ask the obvious question someone else is wondering. I read every comment.