In one of our previous articles, we learned about CQRS and the usage of the MediatR Library. Now, let’s see how to take advantage of this library to the maximum.
Let’s learn about MediatR Pipeline Behaviour in ASP.NET Core, the idea of Pipelines, and How to intersect the pipeline and add various Services like Logging and Validations.
As learnt in the previous article, MediatR is a tool/library which essentially can make your Controllers thin and decouple the functionalities to a more message-driven approach. Then, we learnt about its importance while implementing the CQRS Pattern in ASP.NET Core Applications, which is commands and queries Responsibility Segregation.
Pipelines - Overview
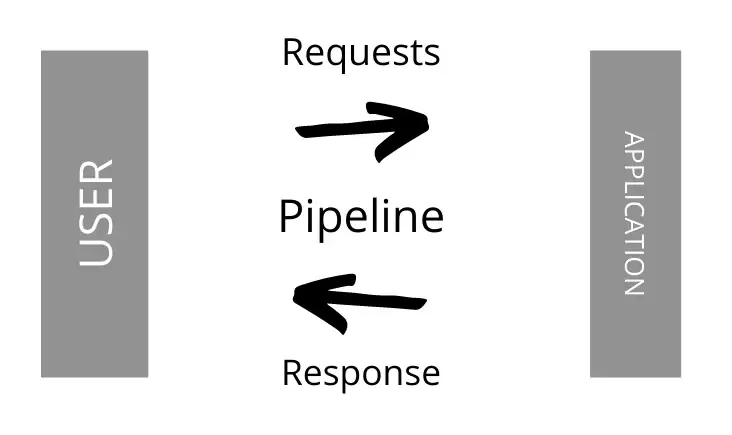
What happens internally when you send a request to any application? Ideally, it returns the response. But there is one thing you might now be aware of, Pipelines. Now, these requests and responses travel forth and back through Pipelines in ASP.NET Core. So, when you send a request, the request message passes from the user through a pipeline towards the application, where you perform the requested operation with the request message. Once done, the application sends back the message as a response through the pipeline towards the user end. Get it? Thus these pipelines are completely aware of what the request or response is. This is also a very important concept while learning about Middlewares in ASP.NET Core.
Here is an image depicting the above-mentioned concept.

Let’s say I want to validate the request object. How would you do it? You would basically write the validation logic which executes after the request has reached the end of the pipeline towards the application. That means you are validating the request only after it has reached the application. Although this is a fine approach, let’s give a thought about it. Why do you need to attach the validation logics to the application, when you can already validate the incoming requests even before it hits any of the application logics? Makes sense?
A better approach would be to somehow wire up your validation logic within the pipeline, so that the flow becomes like the user sends a request through the pipeline ( validation logic here), if the request is valid, hit the application logic, else throws a validation exception. This makes quite a lot of sense in terms of efficiency, right? Why hit the application with invalid data, when you could filter it out much before?
This is not only applicable for validations but for various other operations like logging, performance tracking and much more. You can be really creative about this.
MediatR Pipeline Behaviour
Coming back to MediatR, it takes a more pipeline kind of approach where your queries, commands and responses flow through a pipeline setup by MediatR.
Let me introduce you to the Behaviours of MediatR. MediatR Pipeline Behaviour was made available from Version 3 of this awesome library.
We know that these MediatR requests or commands are like the first contact within our application, so why not attach some services in its Pipeline?
By doing this, we will be able to execute services/ logics like validations even before the Command or Query Handlers know about it. This way, we will be sending only necessary valid requests to the CQRS Implementation. Logging and Validation using this MediatR Pipeline Behavior are some of the common implementations.
Getting Started
Enough of all the long essays, let’s jump straight into some code. For this article, I will use the CQRS Implementation where I already have set up MediatR. We will be adding Validations (Fluent Validations) and General Logging to the commands and requests that go through the pipeline.
Please refer to the following Github Repo to code along. You can find the commit named “CQRS Implementation” to start from the point where I am going to start coding now.

So, you got the concepts clear. Here is what we are going to build. In our CQRS-implemented ASP.NET Core Solution, we are going to add validation and logging to the MediatR Pipeline.
Thus, any <Feature>Command or <Feature>Query requests would be validated even before the request hits the application logic. Also, we will log every request and response that goes through the MediatR Pipeline.
Fluent Validations with MediatR.
For validating our MediatR requests, we will use the Fluent Validation Library.
To learn more about this awesome library, check out my previous post - Fluent Validation in ASP.NET Core 3 – Powerful Validations
Here is the requirement. We have an API endpoint that is responsible for creating a product in the database from the request object that includes the product name, prices, barcode and so on. But we would want to validate this request in the pipeline itself.
So, here is the MediatR Request and Handler - https://github.com/iammukeshm/CQRS.WebApi/blob/master/CQRS.WebApi/Features/ProductFeatures/Commands/CreateProductCommand.cs
Before adding Validation to the MediatR Pipeline, let’s first install the Fluent Validation Packages.
Install-Package FluentValidationInstall-Package FluentValidation.DependencyInjectionExtensionsAdd a new Folder to the root of our Application and name it Validators. Here is where we are going to add all the validators to. Since we are going to validate the CreateProductCommnd object, let’s name our Validator as CreateProductCommndValidator. So add a new file to the Validators folder named CreateProductCommndValidator.
public class CreateProductCommndValidator : AbstractValidator<CreateProductCommand>{ public CreateProductCommndValidator() { RuleFor(c => c.Barcode).NotEmpty(); RuleFor(c => c.Name).NotEmpty(); }}We will keep things simple for this tutorial. Here I am just checking if the Name and Barcode numbers are not empty. You could take this a step further by injecting a DbContext to this constructor and checking if the barcode already exists. Learn more about various validation implementations using Fluent Validation in this article.
We have n number of similar validators for each command and query. This helps keep the code well-organized and easy to test.
Before continuing, let’s register this validator with the ASP.NET Core DI Container. Navigate to Startup. cs/ConfigureServices.cs and add in the following line.
services.AddValidatorsFromAssembly(typeof(Startup).Assembly);This essentially registers all the validators that are available within the Assembly that also contain the Startup.cs. Understand?
Now that we have our validator set up, Let’s add the Validation to the Pipeline Behaviour. Create another new folder in the root of the application and name it PipelineBehaviours. Here, Add a new Class, ValidationBehvaviour.cs.
public class ValidationBehaviour<TRequest, TResponse> : IPipelineBehavior<TRequest, TResponse> where TRequest : IRequest<TResponse>{ private readonly IEnumerable<IValidator<TRequest>> _validators; public ValidationBehaviour(IEnumerable<IValidator<TRequest>> validators) { _validators = validators; } public async Task<TResponse> Handle(TRequest request, CancellationToken cancellationToken, RequestHandlerDelegate<TResponse> next) { if (_validators.Any()) { var context = new ValidationContext<TRequest>(request); var validationResults = await Task.WhenAll(_validators.Select(v => v.ValidateAsync(context, cancellationToken))); var failures = validationResults.SelectMany(r => r.Errors).Where(f => f != null).ToList(); if (failures.Count != 0) throw new FluentValidation.ValidationException(failures); } return await next(); }}Line #2 - Here, we get a list of all registered validators.
Line #6 -Initializing the validator, and also validating the request.
Line #8 - Here is the Handler method
Line #10 - If any validation errors are found, It extracts all the messages and returns the errors as a response.
We have one last thing to do. Register this Pipeline behaviour in the ASP.NET Core Service Container. Again, go back to Startup.cs/ConfigureServices and add this.
services.AddTransient(typeof(IPipelineBehavior<,>), typeof(ValidationBehaviour<,>));Since we need to validate each and every request, we add it with a Transient Scope to the container.
That’s it, Quite Simple to set up right? Let’s test this API Endpoint with Swagger (Since I already have Swagger integrated within the application from my previous article. I highly recommend you to go through the linked articles to gain better knowledge about the entire scenario).
Let’s run the application. But, to understand the flow of the request even better, Let’s add a few breakpoints.
-
At the start of the ProductController action method, Create. The request should pass through this controller to the mediatR which further takes it through the pipeline.
-
At the start of the ValidationBehaviour’s Handle Method.
-
And at the start of the CreateProductCommndValidator too.

Let’s add a blank Name and barcode to the Request. Ideally, it should throw back a Validation Exception.
You can see that the request first goes to the controller, which then sends a MediatR request that travels through the pipeline. Next, it hits the CreateProductCommndValidator where the request is validated. After that, it goes to the Handle method of our pipeline.

As you can see, Here are the expected failures. Let’s now see the response back in Swagger.

There you go, A Validation Exception like we wanted. Now, you can prettify this response by mapping it to a different Response Object using a Custom Error Handling Middleware. I will post a detailed article about this later.
The point to be noted is that the request reaches the Handler Method of the CreateProductCommand only if it is valid. This cleanly demonstrates MediatR Pipeline’s Behaviour.
Logging with MediatR
Now that we have a clear understanding of the MediatR Pipeline Behaviour, let’s try to log all the incoming requests and outgoing responses in the pipeline. It will be as simple as Creating a new LoggingBehaviour class and adding it to the pipeline.
For this demonstration, I will use the default logger of ASP.NET Core.
If you looking for some advanced logging for your ASP.NET Core Application, I recommend you to check out - Serilog in ASP.NET Core 3.1 – Structured Logging Made Easy. Serilog is probably the best logging framework available with tons of great features. Do check it out.
public class LoggingBehaviour<TRequest, TResponse> : IPipelineBehavior<TRequest, TResponse>{    private readonly ILogger<LoggingBehaviour<TRequest, TResponse>> _logger;
    public LoggingBehaviour(ILogger<LoggingBehaviour<TRequest, TResponse>> logger)    {        _logger = logger;    }
    public async Task<TResponse> Handle(TRequest request, CancellationToken cancellationToken, RequestHandlerDelegate<TResponse> next)    {        //Request        _logger.LogInformation($"Handling {typeof(TRequest).Name}");        Type myType = request.GetType();        IList<PropertyInfo> props = new List<PropertyInfo>(myType.GetProperties());        foreach (PropertyInfo prop in props)        {            object propValue = prop.GetValue(request, null);            _logger.LogInformation("{Property} : {@Value}", prop.Name, propValue);        }
        var response = await next();
        //Response        _logger.LogInformation($"Handled {typeof(TResponse).Name}");        return response;    }}
Similar to our previous ValidationBehvaiour class, we structure our LoggingBehvaiour too! But here in Line #7, we inject the ILogger too.
Line #12-20 - Logging the Request
Line #24-26 - Logging the Response
Lines #13-20 - I wrote a small snippet that can extract the property names and values from the request object and log it using the ILogger object.
Be careful while using this in production environment as your request may have sensitive information like passwords and so on. You really would not want to log it. This implementation is just to make you understand the flexibililty of MediatR Pipeline Behaviour.
After that, let’s go back to Startup.cs/ConfigureServices to register this Behaviour.
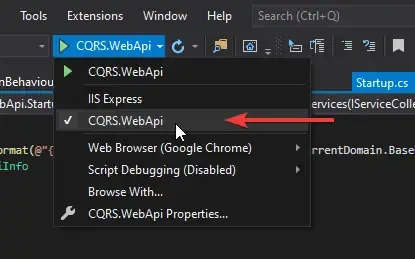
services.AddTransient(typeof(IPipelineBehavior<,>), typeof(LoggingBehaviour<,>));Let’s test our Implementation. But before that make sure you are running your application using the Kestrel Server rather than IIS. Kestrel gives some better control over your application. In this scenario, I want you to use the Kestrel server because it has a built-in console logging available. Thus we could log in real time while working with the application.
To switch to Kestrel all you have to do is, click on this dropdown and select your ProjectName.

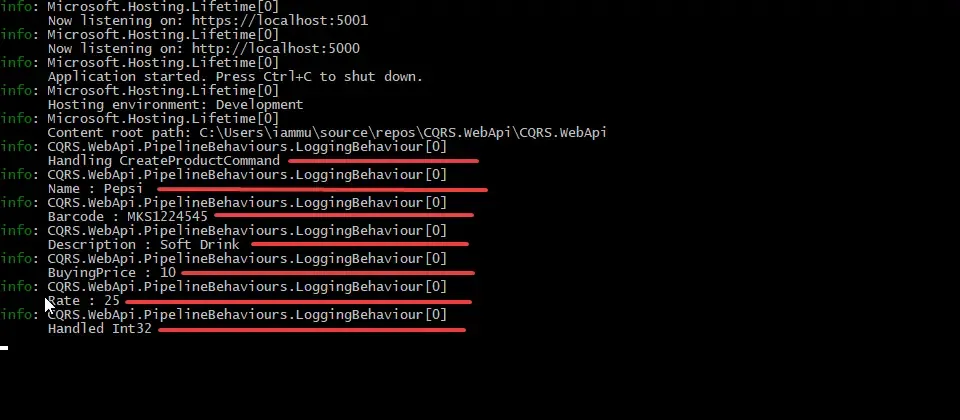
Now run the application. Here is the sample Request that I am trying to pass. Execute it.

In your console, you can see the responses and requests. Pretty Cool yeah? That too with real minimal lines of codes.

Let’s wind up the article here. I Hope things are pretty clear.
Something More?
Recently I wrote a separate article that takes advantage of the MediatR pipeline and uses it for Caching the application response. The major advantages of this is :
-
Super fast response times
-
reduced load on API and database servers.
-
Saves you $$$ by minimizing database calls.
-
Better User Experience.
-
and so much more.
Read it here - Response Caching with MediatR in ASP.NET Core
Summary
In this article, we learnt about MediatR Pipeline Behaviour in ASP.NET Core, the idea of Pipelines, and How to intersect the pipeline and add various Services. We also implemented Validations (using Fluent Validation) and Logging within the MediatR Pipeline. You can find the entire source code of this implementation here. What are the other Pipeline Behaviours that you have worked it or plan on implementing? Do you have any suggestions or feedback for me? Let me know in the comments section below. Do not forget to share this article with your Developer Community. Thanks and Happy Coding! :D
