When it comes to Validating Models, aren’t we all leaning toward Data Annotations? There are quite a lot of serious issues with this approach for a scalable system. There is a library, Fluent Validations that can turn up the validation game to a whole new level, giving you total control.
In this article, we will talk about Fluent Validation and its implementation in ASP.NET Core Applications. We will discuss the preferred alternative to Data Annotations and implement it in an ASP.Net core API. The source code will be provided at the end of the article.
The Problem
Data Validation is extremely vital for any Application. The GO-TO Approach for Model validation in any .NET Application is Data Annotations, where you have to declare attributes over the property of models. Worked with it before?
public class Developer{ [Required] public string FirstName { get; set; } [Required] public string LastName { get; set; } [EmailAddress] public string Email { get; set; } [Range(minimum:5,maximum:20)] public decimal Experience { get; set; }}It is fine for beginners. But once you start learning clean code, or begin to understand the SOLID principles of application design, you would just never be happy with Data Annotations as you were before. It is clearly not a good approach to combine your models and validation logic.
With the implementation of Data Annotations in .NET Classes, the problem is that there will be a lot of duplication lines of code throughout your application. What if the Developer Model class is to be used in another application/method where these Attribute validation changes? What if you need to validate a model that you don’t have access to? Unit testing can get messy as well. You will definitely end up building multiple model classes which will no longer be maintainable in the longer run. So, what’s the solution?
Introducing Fluent Validation - The Solution
Fluent Validation is a free-to-use .NET validation library that helps you make your validations clean, easy to create, and maintain. It even works on external models that you don’t have access to, with ease. With this library, you can separate the model classes from the validation logic as it is supposed to be. It doesn’t make your Model classes ugly like Data Annotations do. Also, better control of validation is something that makes the developers prefer Fluent Validation.
Fluent validations uses lamba expressions to build validation rules.
For small systems, I would recommend just using Data Annotations, because they’re so easy to set up. For larger, more complex systems, I would recommend separating the validation concern using validator objects with Fluent Validation.
Implementing Fluent Validation in ASP.NET Core Applications
For this simple demonstration, let’s work on an ASP.NET Core 3.1 API Project that does nothing other than just validation with Fluent Validation. I will be using Postman to test and receive the validation messages and Visual Studio 2019 Community as my IDE ( the best for C# development)
Getting Started
Here is what the project structure would look like.
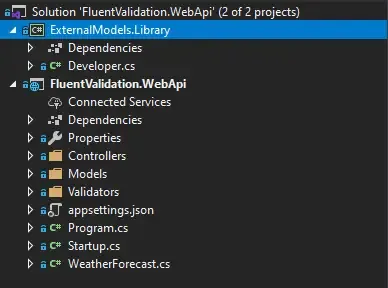
We will have 2 Projects in our Solution. One for the actual ASP.NET Core API, and the other one will be to mimic a Library that will have a model class to which we DO NOT have access. Let’s get started.
Installing FluentValidation.AspNetCore
Begin by installing this awesome library into your WebApi project via the Package Manage Console.
Install-Package FluentValidation.AspNetCore
Configuring FluentValidation
We will have to add Fluent Validation to our application. Navigate to Startup.cs and modify as follows.
public void ConfigureServices(IServiceCollection services){ services.AddControllers() .AddFluentValidation(s => { s.RegisterValidatorsFromAssemblyContaining<Startup>(); s.RunDefaultMvcValidationAfterFluentValidationExecutes = false; });}Line #4 Add the Fluent Validation.
Line #6 Registers all the Custom Validations that are going to build. Note that, we will place our Validators within the API Project for this demonstration.
Line #7 It is possible to use both Fluent Validation and Data Annotation at a time. Let’s only support Fluent Validation for now.
Developer Model
A simple Developer class with basic properties.
public class Developer{ public string FirstName { get; set; } public string LastName { get; set; } public string Email { get; set; } public decimal Experience { get; set; }}Developer Controller
Create a new Controller at Controllers/DeveloperController.cs
[HttpPost]public async Task<IActionResult> Create(Developer developer){ return Ok();}Literally an ultra-slim Controller. Here we will just send a response OK if the passed model is valid.
Remember we spoke about validators while registering the services at Startup.cs?
What’s a Custom Fluent Validator?
In order to apply custom validation rules to properties of a model class/object. we will have to build custom validators. These Abstract Validators are of type T, where T will be your concerned class.
Creating the First Validator
Since we have made the Developer Model, let’s create a validator with 1 or 2 rules, just to get started.
public class DeveloperValidator : AbstractValidator<Developer>{ public DeveloperValidator() { RuleFor(p => p.FirstName).NotEmpty(); }}Line #1 , the name of the class is DeveloperValidator, whose base class is AbstractValidator<T>, where T is of type Developer.
Line #3 Constructor
Line #4 Our First Rules for the Property FirstName. Here it is mentioned that it should not be empty.
Testing with Postman
Run your API and open up Postman and POST a Developer model to the endpoint we built just now, ../api/developer.
{ "FirstName":"Mukesh", "LastName":"Murugan", "Experience":4}
All good, we get an OK message. Now, remove the FirstName and leave it blank.Send a POST request.
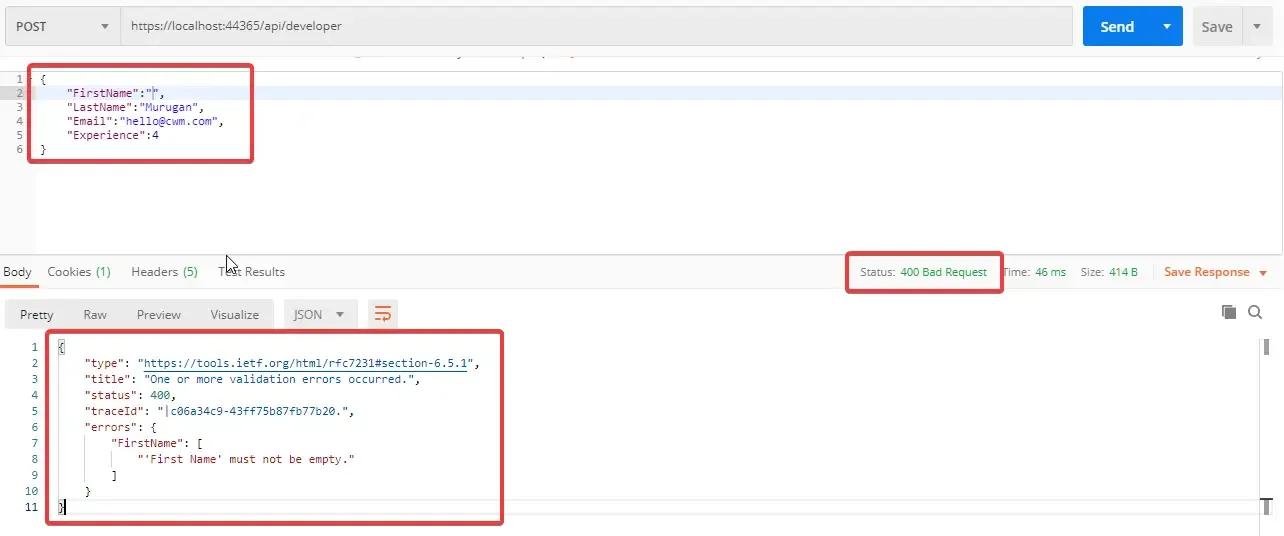
Congrats. you built your own Validator. Quite simple and powerful, yeah? Let’s look into the response.
{ "type": "https://tools.ietf.org/html/rfc7231#section-6.5.1", "title": "One or more validation errors occurred.", "status": 400, "traceId": "|e74d6837-4bbade115ebb90e2.", "errors": { "FirstName": [ "'First Name' must not be empty." ] }}It’s a 400 Bad Request Error Code which makes sense. Line #6 gives an array of errors. In our case, just 1 error and 1 property. Let’s make more errors and more rules, yeah? :D
Adding a Custom Message to Errors.
It’s highly practical to show custom validation based on the property. It’s quite simple with Fluent Validation. Go to the DeveloperValidator.cs and modify our existing rule.
RuleFor(p => p.FirstName).NotEmpty().WithMessage("{PropertyName} should be not empty. NEVER!");Use
{PropertyName}to get the corresponding Property Name. These are placeholder variables of Fluent Validation Library. Read more about them here.
Let’s check it with POSTMAN.
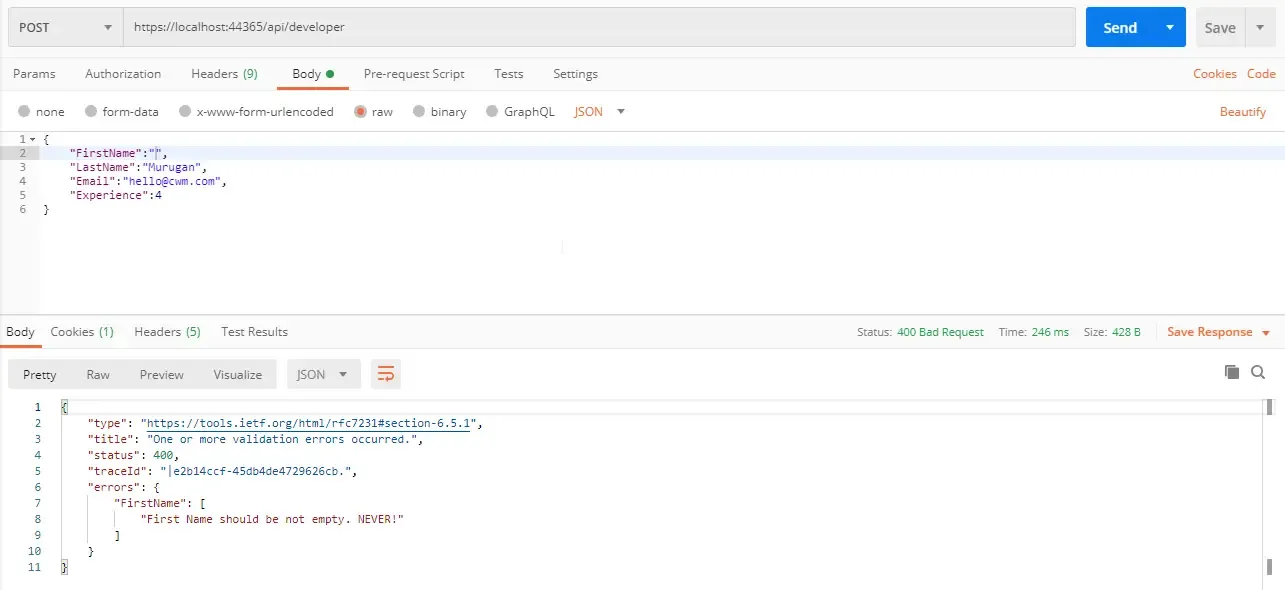
Done, you have now learned how to display custom validation messages for properties.
Validating the String Length
I am really not sure if people have names with 2 letters. But let’s say, our system has a specific rule to only accepts name that is more than 2 characters. Also, our database says not more than 25 letters, please. With Fluent Validation, it is easy to notify the user upfront to use a first name that is within this range. Get the requirement? Let’s implement it then.
RuleFor(p => p.FirstName).NotEmpty().WithMessage("{PropertyName} should be not empty. NEVER!").Length(2,25);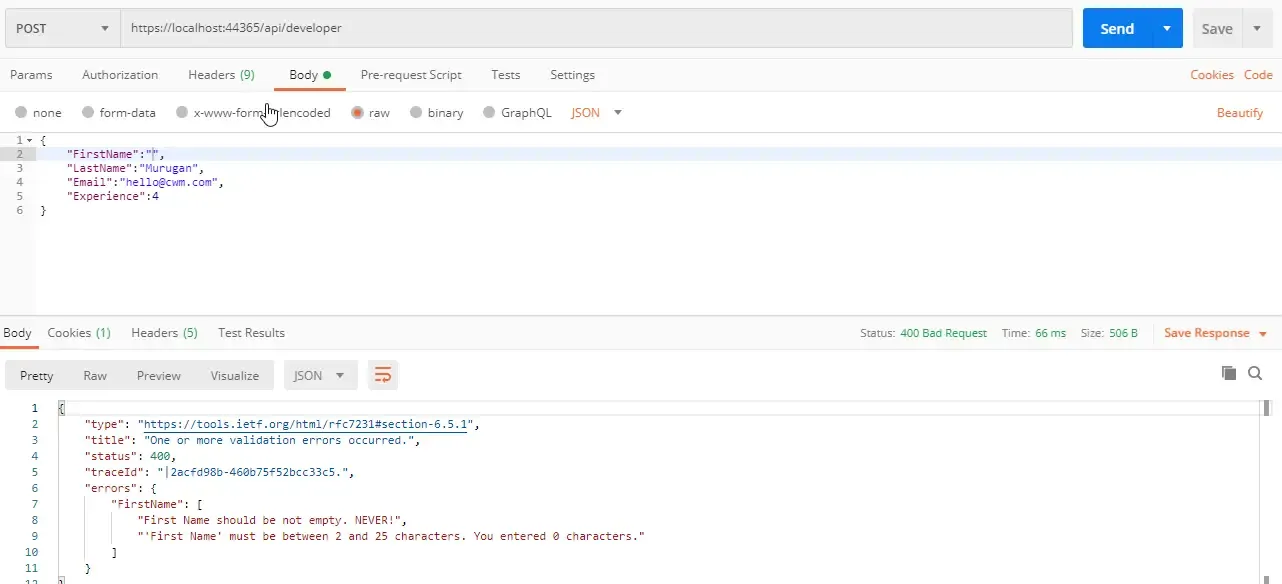
We get multiple validation error messages now. Pretty Sweet! But from a practical point of view, do you really need to show these 2 errors? Like, they are almost meaning the same. So how do we avoid showing 2 validation errors?
Stop on First Failure
Like I mentioned above, there can be scenarios where you actually need not run multiple validation rules for a property even if it fails at the first rule.
RuleFor(p => p.FirstName) .Cascade(CascadeMode.StopOnFirstFailure) .NotEmpty().WithMessage("{PropertyName} should be not empty. NEVER!") .Length(2,25);Line #2 means that when the validator hits its first error for the corresponding property, it stops. Now run the API and switch to Postman.
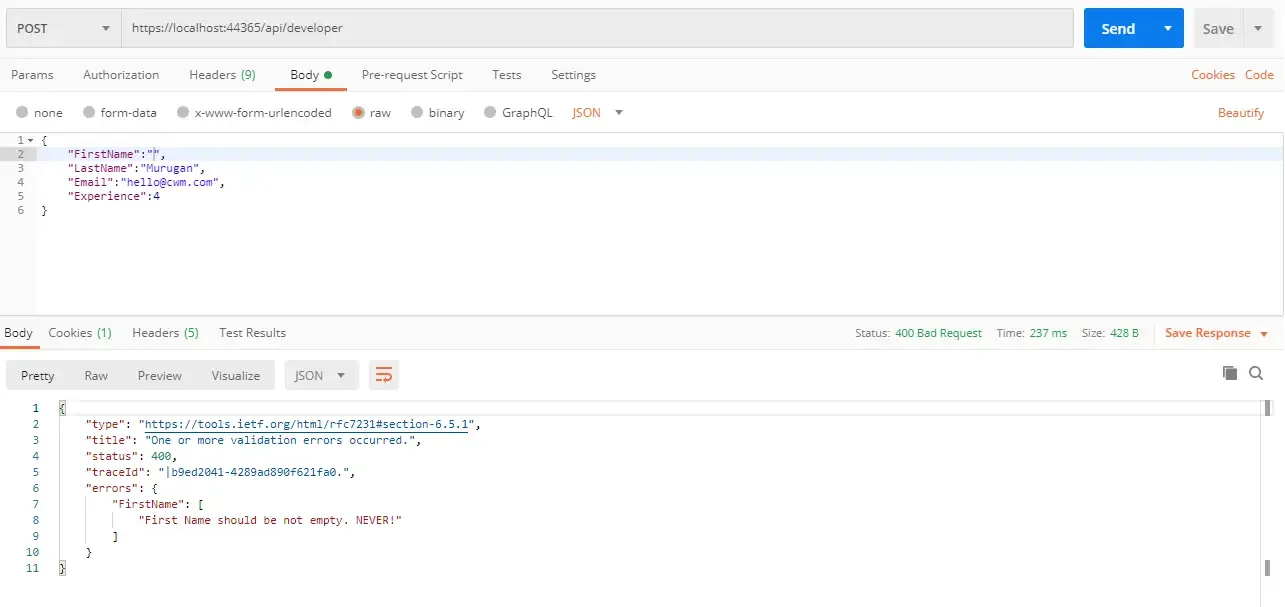
Cool, now let’s add a single character to the first name and try. Remember we set the minimum length of the first name to 2?
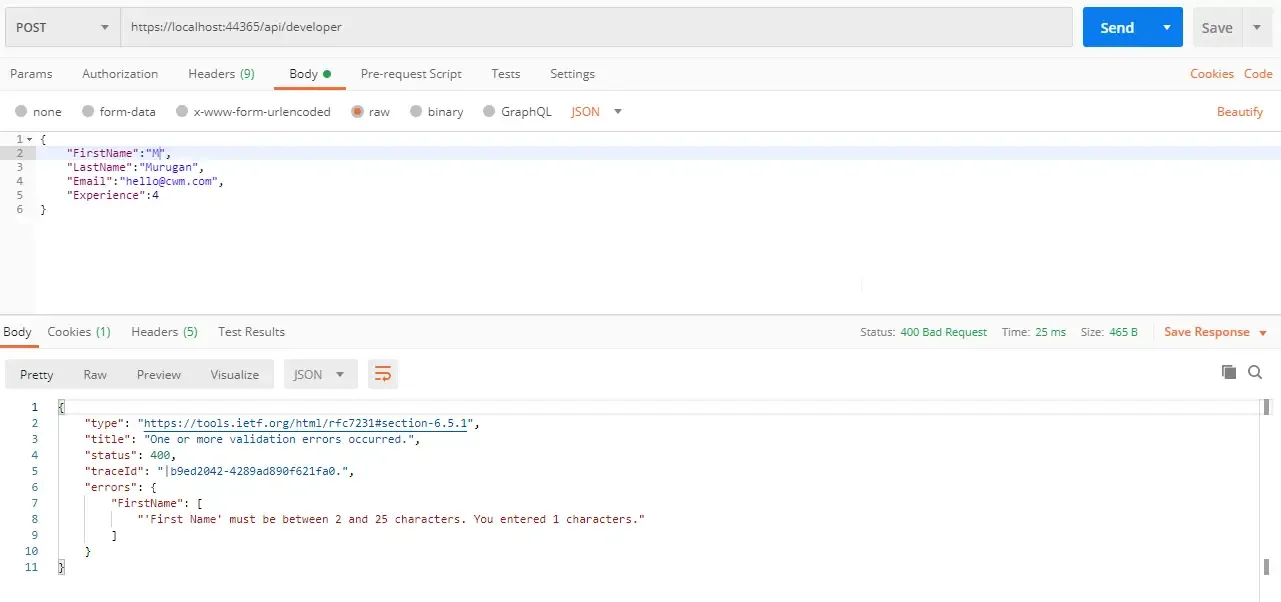
Working as we excepted.
Integrating Custom Functions

As an example, Theoretically, you could pass a number as the first name and the API would just say ‘Cool, that’s fine’. Let’s see how to build a validation rule with Fluent Validation for such a scenario.
First create a simple helper method that would take in our firstname property and return a boolean based on its content. We will place this method in our DeveloperValidator class itself.
private bool IsValidName(string name){ return name.All(Char.IsLetter);}Now, let’s add this requirement to the rule and wire it up with our helper method.
RuleFor(p => p.FirstName) .Cascade(CascadeMode.StopOnFirstFailure) .NotEmpty().WithMessage("{PropertyName} should be not empty. NEVER!") .Length(2, 25) .Must(IsValidName).WithMessage("{PropertyName} should be all letters.");Line #5 suggests that the property with return a true when passed to our helper. Let’s run the application and go to Postman.

So, that is taken care of as well.
Adding a new Rule
Now that we have added a rule for Validating First Names, let’s build one Last Name as well. I will just copy the rule of FirstName and Replace the property name.
public DeveloperValidator(){    RuleFor(p => p.FirstName)        .Cascade(CascadeMode.StopOnFirstFailure)        .NotEmpty().WithMessage("{PropertyName} should be not empty. NEVER!")        .Length(2, 25)        .Must(IsValidName).WithMessage("{PropertyName} should be all letters.");
    RuleFor(p => p.LastName)        .Cascade(CascadeMode.StopOnFirstFailure)        .NotEmpty().WithMessage("{PropertyName} should be not empty. NEVER!")        .Length(2, 25)        .Must(IsValidName).WithMessage("{PropertyName} should be all letters.");}
Let’s run our application and check with Postman.
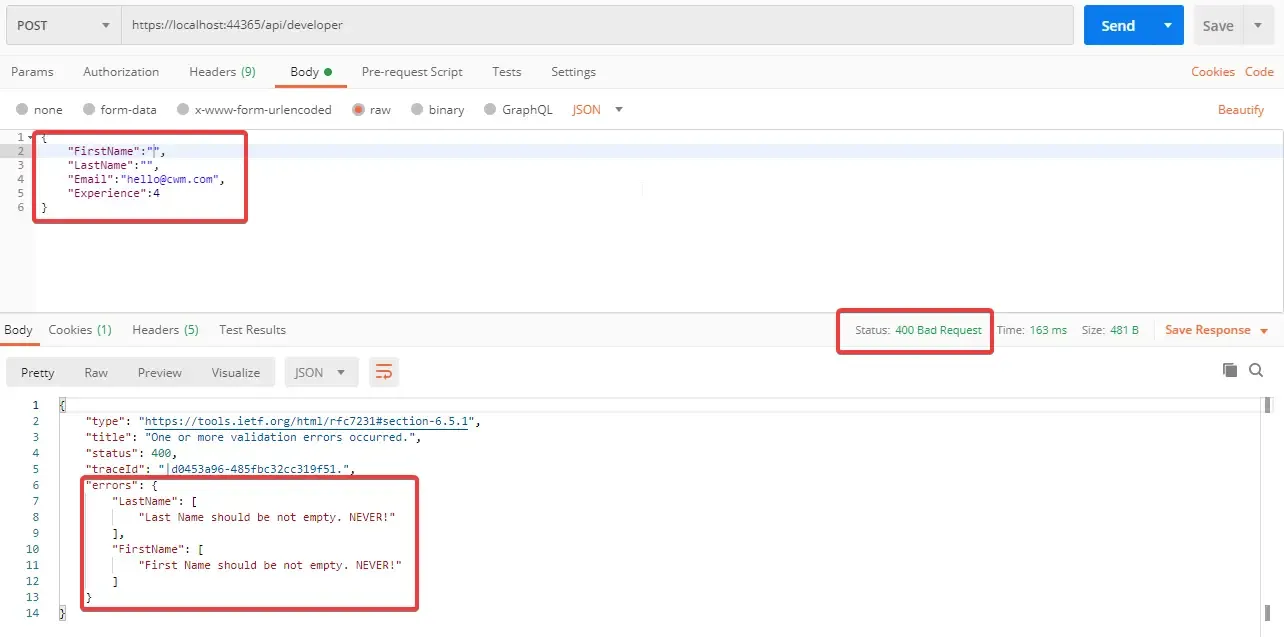
We see that now we have multiple properties being validated.
Email Validation
Since we are accepting emails in our endpoint, let’s validate that as well. Email Validation is something that comes out of the box with Fluent Validation.
RuleFor(p => p.Email) .EmailAddress();I will try to enter an invalid email address and post it via Postman.
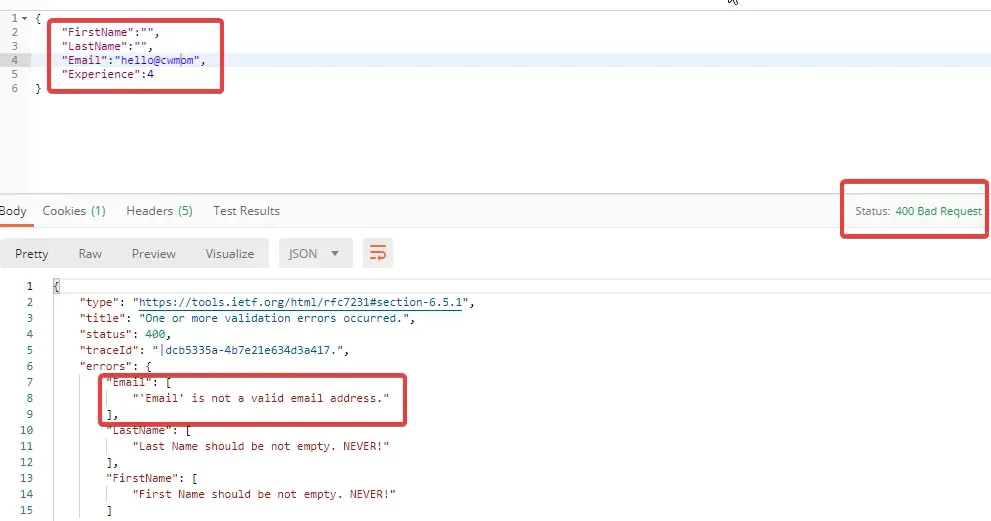
As Simple as that. There are quite a bunch of built-in validators included in the Fluent Validation library. Check them out here.
Manual Validation
There can be a case where you need to validate an object manually within your application using FLuent Validation. Let’s try to replicate such a use case. We will build a response model in Models/ResponseModel.cs which will return a list of error messages from within our code.
public class ResponseModel{ public ResponseModel() { IsValid = true; ValidationMessages = new List<string>(); } public bool IsValid { get; set; } public List<string> ValidationMessages { get; set; }}As you can see, it has a boolean property and a list of Error Messages. We will create another simple class like Developer.cs. Let’s name is Tester.cs
public class Tester{ public string FirstName { get; set; } public string LastName { get; set; } public string Email { get; set; } public decimal Experience { get; set; }}I will add a Simple Validator for the Tester Model at Validators/TesterValidator.cs.
public class TesterValidator : AbstractValidator<Tester>{ public TesterValidator() { RuleFor(p => p.FirstName) .Cascade(CascadeMode.StopOnFirstFailure) .NotEmpty().WithMessage("{PropertyName} should be not empty. NEVER!") .Length(2, 25); }}Now let’s build a controller named Controllers/TesterController.cs
[HttpPost]public async Task<IActionResult> Create(){ TesterValidator validator = new TesterValidator(); List<string> ValidationMessages = new List<string>(); var tester = new Tester { FirstName = "", Email = "bla!" }; var validationResult = validator.Validate(tester); var response = new ResponseModel(); if (!validationResult.IsValid) { response.IsValid = false; foreach (ValidationFailure failure in validationResult.Errors) { ValidationMessages.Add(failure.ErrorMessage); } response.ValidationMessages = ValidationMessages; } return Ok(response);}Line #4 creates a new instance of our Validator.
Line #5 a new list of strings - Errors.
Line #6-7 a dummy tester object having obvious validation errors.
Line #11 here we validate the dummy object,
Run the Application and switch to Postman.
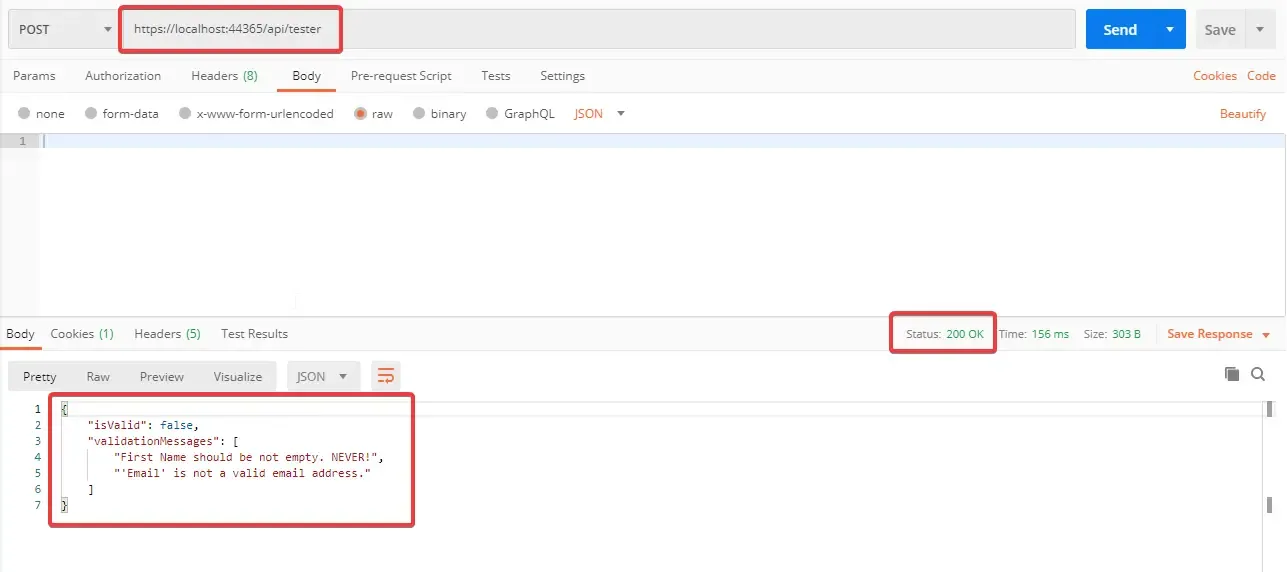
There you have it. This is how you implement manual validation with Fluent Validation Library in ASP.NET Core Applications. You could have your own variants of course.
Summary
I hope you have understood this simple-to-follow guide about Fluent Validation. I am sure you will be switching to this powerful library from today onwards! These guys have some great documentation as well. Check it out too! What are your opinions about this library? Some devs still prefer Data Annotations over this. What about you? Let me know in the comments below.
If you found this article helpful,
Frequently Asked Questions
Is Fluent Validation Better than Data Annotations?
For small systems, I would recommend just using Data Annotations, because they’re so easy to set up. For larger, more complex systems, I would recommend separating the validation concern using validator objects with Fluent Validation.
